父子组件调用
父组件调用子组件方法
父组件可以通过 ref 获取子组件实例,然后调用子组件暴露的方法。
实现步骤:
- 子组件使用
defineExpose暴露方法 只有通过defineExpose暴露的方法,父组件才能调用。 - 父组件使用
ref获取子组件实例 - 父组件通过
childRef.value.xxx()调用子组件方法
这种方式常用于:
- 父组件控制子组件 表单提交
- 父组件触发子组件 刷新数据
- 父组件控制子组件 弹窗打开
- 父组件调用子组件 校验方法
子组件 Child.vue
<template>
  <el-card class="box-card" shadow="hover"> <!-- ElementPlus 卡片组件 -->
    <div>
      <p>子组件内容: {{ message }}</p> <!-- 显示消息 -->
      <el-button type="primary" @click="localAlert">本地按钮触发方法</el-button> <!-- 本地方法演示 -->
    </div>
  </el-card>
</template>

<script lang="ts">
import { defineComponent, ref } from 'vue'

export default defineComponent({
  name: 'Child',
  setup(_, { expose }) {
    const message = ref('Hello from Child') // 子组件内部状态

    // 子组件方法:可以被父组件调用
    const showAlert = (text: string) => {
      alert(`子组件方法被调用,传入: ${text}`) // 弹窗展示参数
    }

    const localAlert = () => {
      alert('子组件内部方法触发') // 本地按钮触发
    }

    expose({ showAlert }) // 将方法暴露给父组件调用

    return { message, localAlert }
  }
})
</script>

<style scoped>
.box-card {
  margin: 10px; /* 卡片外边距 */
  padding: 10px; /* 内边距 */
}
</style>父组件 Parent.vue
<template>
  <div>
    <el-button type="success" @click="callChildMethod">调用子组件方法</el-button> <!-- 父组件按钮 -->
    <Child ref="childRef" /> <!-- 使用 ref 引用子组件 -->
  </div>
</template>

<script lang="ts">
import { defineComponent, ref } from 'vue'
import Child from './Child.vue' // 引入子组件

export default defineComponent({
  name: 'Parent',
  components: { Child },
  setup() {
    const childRef = ref<InstanceType<typeof Child>>() // 定义子组件引用类型

    const callChildMethod = () => {
      childRef.value?.showAlert('Hello from Parent') // 调用子组件暴露的方法
    }

    return { childRef, callChildMethod }
  }
})
</script>

<style scoped>
div {
  padding: 20px; /* 父组件内边距 */
}
</style>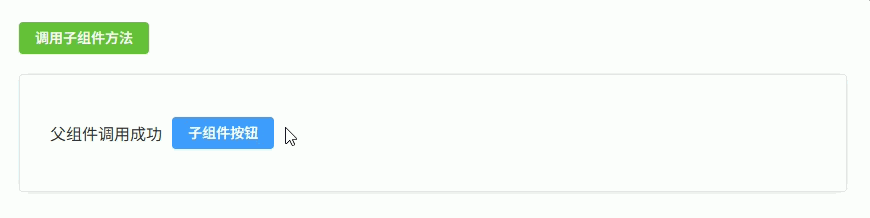
子组件向父组件传递数据(事件传递)
子组件可以通过 emit 触发自定义事件,并将数据传递给父组件。
实现步骤:
- 子组件使用
defineEmits定义事件 - 子组件通过
emit('eventName', data)发送数据 - 父组件通过
@eventName监听事件并接收数据
常见使用场景:
- 子组件表单 提交数据
- 子组件表格 点击操作按钮
- 子组件 选择数据返回
- Dialog 组件 点击确认返回数据
子组件 Child.vue
<template>
  <div class="child"> <!-- 子组件容器 -->

    <el-input
      v-model="inputValue"
      placeholder="请输入内容"
      style="width: 200px"
    /> <!-- ElementPlus 输入框 -->

    <el-button type="primary" @click="sendData">提交数据</el-button> <!-- 点击发送数据 -->

  </div>
</template>

<script setup lang="ts">
import { ref } from 'vue' // 引入 ref

const inputValue = ref('') // 输入框数据

const emit = defineEmits<{ // 定义 emit 事件类型
  (e: 'submit', value: string): void // submit 事件,参数为 string
}>()

const sendData = () => { // 发送数据方法
  emit('submit', inputValue.value) // 向父组件发送 submit 事件并携带数据
}
</script>

<style scoped>
.child {
  display: flex; /* 使用 flex 布局 */
  gap: 10px; /* 子元素间距 */
  align-items: center; /* 垂直居中 */
  margin-top: 20px; /* 上外边距 */
}
</style>父组件 Parent.vue
<template>
  <div class="container"> <!-- 父组件容器 -->

    <Child @submit="handleSubmit" /> <!-- 监听子组件 submit 事件 -->

    <el-card class="result-card"> <!-- 显示返回数据 -->
      接收到的数据:{{ result }}
    </el-card>

  </div>
</template>

<script setup lang="ts">
import { ref } from 'vue' // 引入 ref
import Child from './Child.vue' // 引入子组件

const result = ref('') // 接收子组件数据

const handleSubmit = (value: string) => { // 处理子组件事件
  result.value = value // 保存子组件传来的数据
}
</script>

<style scoped>
.container {
  padding: 20px; /* 容器内边距 */
}

.result-card {
  margin-top: 20px; /* 卡片上边距 */
}
</style>
父组件向子组件传递 props
父组件可以通过 props 向子组件传递数据。
子组件通过 defineProps 接收数据。
常见传递类型:
- 普通值(string / number / boolean)
- 对象
- 数组
- 函数(回调函数)
实现步骤:
- 父组件通过
:propName="value"传递数据 - 子组件通过
defineProps接收 - 子组件可以直接使用这些数据
常见使用场景:
- 表格组件传入 数据列表
- 表单组件传入 默认值
- Dialog组件传入 标题
- 子组件触发 父组件回调函数
子组件 Child.vue
<template>
  <div class="child"> <!-- 子组件容器 -->

    <el-card class="card"> <!-- ElementPlus 卡片 -->

      <p>用户名:{{ name }}</p> <!-- 普通值 -->

      <p>年龄:{{ age }}</p> <!-- number -->

      <p>城市:{{ userInfo.city }}</p> <!-- 对象 -->

      <p>标签:</p>
      <el-tag
        v-for="item in tags"
        :key="item"
        class="tag"
      >
        {{ item }}
      </el-tag> <!-- 数组 -->

      <div style="margin-top:10px">
        <el-button type="primary" @click="handleClick">
          调用父组件函数
        </el-button> <!-- 调用父组件函数 -->
      </div>

    </el-card>

  </div>
</template>

<script setup lang="ts">
interface UserInfo { // 定义对象类型
  city: string
}

const props = defineProps<{ // 定义 props 类型
  name: string
  age: number
  userInfo: UserInfo
  tags: string[]
  onAction: (msg: string) => void
}>()

const handleClick = () => { // 按钮点击
  props.onAction('子组件触发回调') // 调用父组件函数
}
</script>

<style scoped>
.child {
  margin-top: 20px; /* 上外边距 */
}

.card {
  padding: 10px; /* 内边距 */
}

.tag {
  margin-right: 6px; /* 右间距 */
}
</style>父组件 Parent.vue
<template>
  <div class="container"> <!-- 父组件容器 -->

    <Child
      :name="name"
      :age="age"
      :userInfo="userInfo"
      :tags="tags"
      :onAction="handleAction"
    /> <!-- 向子组件传递 props -->

    <el-card class="result">
      父组件接收到回调:{{ result }}
    </el-card>

  </div>
</template>

<script setup lang="ts">
import { ref, reactive } from 'vue'
import Child from './Child.vue'

const name = ref('Tom') // 普通值

const age = ref(25) // number

const userInfo = reactive({ // 对象
  city: 'Shanghai'
})

const tags = ref(['Vue3', 'TypeScript', 'ElementPlus']) // 数组

const result = ref('') // 接收回调结果

const handleAction = (msg: string) => { // 子组件回调函数
  result.value = msg
}
</script>

<style scoped>
.container {
  padding: 20px; /* 内边距 */
}

.result {
  margin-top: 20px; /* 上边距 */
}
</style>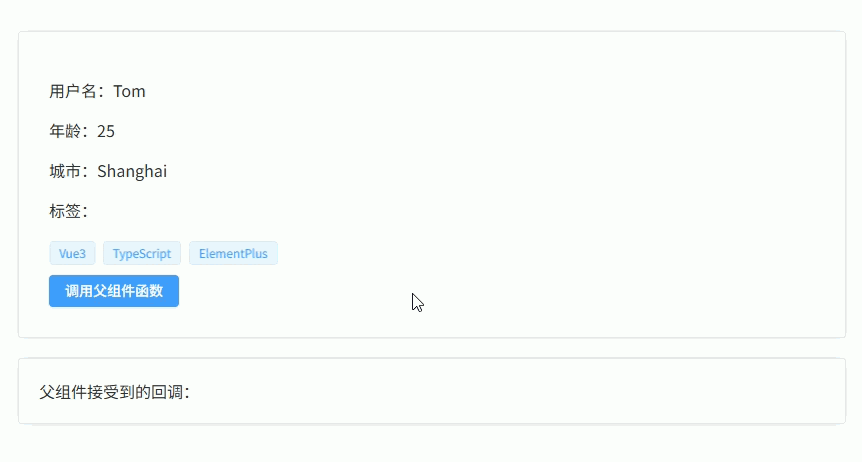
v-model 父子组件双向绑定(modelValue)
Vue3 中 v-model 的本质是:
- 父组件传递
modelValue - 子组件触发
update:modelValue
实现步骤:
- 子组件使用
defineProps接收modelValue - 子组件使用
defineEmits触发update:modelValue - 父组件使用
v-model绑定数据
常见使用场景:
- Dialog 弹窗组件
- 自定义输入组件
- 开关组件
- 封装表单组件
子组件 Child.vue
<template>
  <div class="child"> <!-- 子组件容器 -->

    <el-input
      :model-value="modelValue"
      @input="handleInput"
      placeholder="请输入内容"
      style="width: 220px"
    /> <!-- 输入框绑定 modelValue -->

  </div>
</template>

<script setup lang="ts">
const props = defineProps<{ // 接收父组件数据
  modelValue: string
}>()

const emit = defineEmits<{ // 定义事件
  (e: 'update:modelValue', value: string): void
}>()

const handleInput = (value: string) => { // 输入事件
  emit('update:modelValue', value) // 更新父组件数据
}
</script>

<style scoped>
.child {
  margin-top: 20px; /* 上边距 */
}
</style>父组件 Parent.vue
<template>
  <div class="container"> <!-- 父组件容器 -->

    <Child v-model="text" /> <!-- v-model 双向绑定 -->

    <el-card class="result">
      当前值:{{ text }}
    </el-card>

  </div>
</template>

<script setup lang="ts">
import { ref } from 'vue'
import Child from './Child.vue'

const text = ref('Hello Vue3') // v-model 绑定数据
</script>

<style scoped>
.container {
  padding: 20px; /* 内边距 */
}

.result {
  margin-top: 20px; /* 上边距 */
}
</style>
父组件控制子组件 Dialog(弹窗组件封装)
在实际项目中通常 不会直接在页面写 el-dialog,而是封装成组件,例如:
<UserDialog v-model="visible" />实现方式:
- 子组件接收
modelValue控制 Dialog 显示 - 子组件通过
update:modelValue关闭弹窗 - 父组件通过
v-model控制弹窗打开关闭
常见使用场景:
- 新增 / 编辑表单弹窗
- 详情弹窗
- 选择数据弹窗
- 表单提交弹窗
子组件 UserDialog.vue
<template>
  <el-dialog
    :model-value="modelValue"
    title="用户信息"
    width="400px"
    @close="handleClose"
  > <!-- ElementPlus Dialog -->

    <el-form :model="form"> <!-- 表单 -->

      <el-form-item label="用户名">
        <el-input v-model="form.name" /> <!-- 输入框 -->
      </el-form-item>

      <el-form-item label="年龄">
        <el-input v-model="form.age" /> <!-- 输入框 -->
      </el-form-item>

    </el-form>

    <template #footer> <!-- Dialog 底部 -->

      <el-button @click="handleClose">
        取消
      </el-button>

      <el-button type="primary" @click="handleSubmit">
        确定
      </el-button>

    </template>

  </el-dialog>
</template>

<script setup lang="ts">
import { reactive } from 'vue'

const props = defineProps<{ // 接收父组件控制
  modelValue: boolean
}>()

const emit = defineEmits<{ // 定义事件
  (e: 'update:modelValue', value: boolean): void
  (e: 'submit', data: any): void
}>()

const form = reactive({ // 表单数据
  name: '',
  age: ''
})

const handleClose = () => { // 关闭弹窗
  emit('update:modelValue', false)
}

const handleSubmit = () => { // 提交表单
  emit('submit', form)
  emit('update:modelValue', false)
}
</script>

<style scoped>
.el-form-item {
  margin-bottom: 18px; /* 表单间距 */
}
</style>父组件 Parent.vue
<template>
  <div class="container"> <!-- 页面容器 -->

    <el-button type="primary" @click="openDialog">
      新增用户
    </el-button>

    <UserDialog
      v-model="visible"
      @submit="handleSubmit"
    /> <!-- 使用封装的 Dialog -->

    <el-card class="result">
      提交数据:{{ result }}
    </el-card>

  </div>
</template>

<script setup lang="ts">
import { ref } from 'vue'
import UserDialog from './UserDialog.vue'

const visible = ref(false) // 控制 Dialog 显示

const result = ref('') // 接收提交数据

const openDialog = () => { // 打开弹窗
  visible.value = true
}

const handleSubmit = (data: any) => { // 处理提交
  result.value = JSON.stringify(data)
}
</script>

<style scoped>
.container {
  padding: 20px; /* 页面内边距 */
}

.result {
  margin-top: 20px; /* 上边距 */
}
</style>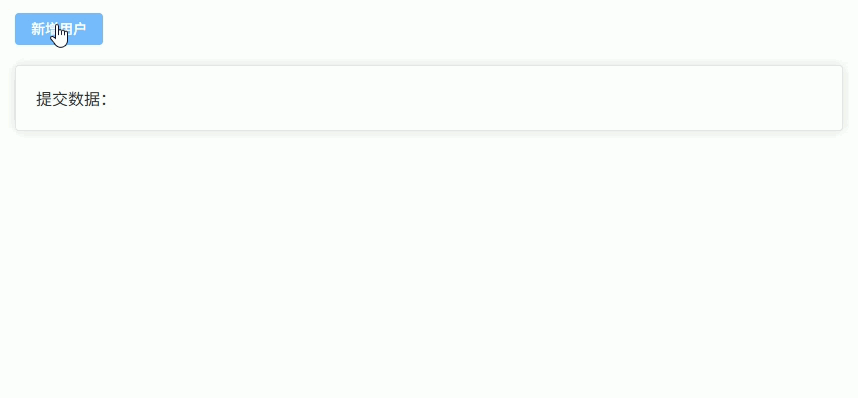
子组件调用父组件方法
子组件触发父组件逻辑有两种常见方式:
- emit 触发父组件事件(推荐方式)
- 父组件传入回调函数,子组件直接调用
常见使用场景:
- 表格组件 点击删除 / 编辑
- 表单组件 点击提交
- 选择组件 返回选中的数据
- 子组件触发 父组件刷新列表
子组件 Child.vue
<template>
  <div class="child"> <!-- 子组件容器 -->

    <el-button type="primary" @click="handleEmit">
      emit 触发父组件
    </el-button> <!-- emit 方式 -->

    <el-button type="success" @click="handleCallback">
      回调函数触发父组件
    </el-button> <!-- 回调函数方式 -->

  </div>
</template>

<script setup lang="ts">
const props = defineProps<{ // 接收父组件传入的函数
  onAction: () => void
}>()

const emit = defineEmits<{ // 定义事件
  (e: 'action'): void
}>()

const handleEmit = () => { // emit 方式
  emit('action') // 触发父组件事件
}

const handleCallback = () => { // 回调函数方式
  props.onAction() // 调用父组件方法
}
</script>

<style scoped>
.child {
  display: flex; /* flex 布局 */
  gap: 10px; /* 元素间距 */
  margin-top: 20px; /* 上边距 */
}
</style>父组件 Parent.vue
<template>
  <div class="container"> <!-- 父组件容器 -->

    <Child
      @action="handleEmitAction"
      :on-action="handleCallbackAction"
    /> <!-- 注册事件 + 传入回调函数 -->

    <el-card class="result">
      执行结果:{{ result }}
    </el-card>

  </div>
</template>

<script setup lang="ts">
import { ref } from 'vue'
import Child from './Child.vue'

const result = ref('') // 结果显示

const handleEmitAction = () => { // emit 方式触发
  result.value = 'emit 调用了父组件方法'
}

const handleCallbackAction = () => { // 回调函数方式触发
  result.value = '回调函数调用了父组件方法'
}
</script>

<style scoped>
.container {
  padding: 20px; /* 内边距 */
}

.result {
  margin-top: 20px; /* 上边距 */
}
</style>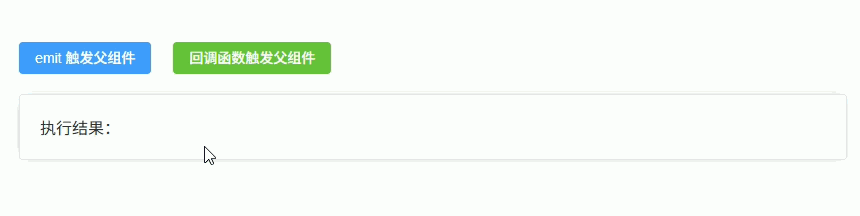
父组件控制子组件表单(提交 / 重置 / 校验)
在后台系统中,常把 查询表单封装成子组件,父组件负责:
- 触发 提交查询
- 触发 重置表单
- 触发 表单校验
实现方式:
- 子组件通过
defineExpose暴露方法 - 父组件通过
ref获取子组件实例 - 父组件调用
submit() / reset() / validate()
典型结构:
page
 ├─ search-form
└─ data-table子组件 SearchForm.vue
<template>
  <el-form
    ref="formRef"
    :model="form"
    :rules="rules"
    label-width="80px"
    class="form"
  > <!-- ElementPlus 表单 -->

    <el-form-item label="用户名" prop="name">
      <el-input v-model="form.name" placeholder="请输入用户名" /> <!-- 输入框 -->
    </el-form-item>

    <el-form-item label="年龄" prop="age">
      <el-input v-model="form.age" placeholder="请输入年龄" /> <!-- 输入框 -->
    </el-form-item>

  </el-form>
</template>

<script setup lang="ts">
import { reactive, ref } from 'vue'
import type { FormInstance, FormRules } from 'element-plus'

const formRef = ref<FormInstance>() // 表单实例

const form = reactive({ // 表单数据
  name: '',
  age: ''
})

const rules: FormRules = { // 表单校验规则
  name: [
    { required: true, message: '请输入用户名', trigger: 'blur' }
  ],
  age: [
    { required: true, message: '请输入年龄', trigger: 'blur' }
  ]
}

const submit = async () => { // 提交方法
  await formRef.value?.validate() // 执行校验
  return { ...form } // 返回表单数据
}

const reset = () => { // 重置表单
  formRef.value?.resetFields()
}

const validate = async () => { // 单独校验方法
  return await formRef.value?.validate()
}

defineExpose({ // 暴露方法给父组件
  submit,
  reset,
  validate
})
</script>

<style scoped>
.form {
  display: flex; /* flex 布局 */
  gap: 20px; /* 表单间距 */
}
</style>父组件 Parent.vue
<template>
  <div class="container"> <!-- 页面容器 -->

    <div class="toolbar"> <!-- 操作按钮区域 -->

      <el-button type="primary" @click="handleSearch">
        查询
      </el-button>

      <el-button @click="handleReset">
        重置
      </el-button>

      <el-button type="success" @click="handleValidate">
        校验
      </el-button>

    </div>

    <SearchForm ref="formRef" /> <!-- 引入子组件 -->

    <el-card class="result">
      查询数据:{{ result }}
    </el-card>

  </div>
</template>

<script setup lang="ts">
import { ref } from 'vue'
import SearchForm from './SearchForm.vue'

const formRef = ref<InstanceType<typeof SearchForm>>() // 子组件引用

const result = ref('') // 显示结果

const handleSearch = async () => { // 查询
  const data = await formRef.value?.submit() // 调用子组件 submit
  result.value = JSON.stringify(data)
}

const handleReset = () => { // 重置
  formRef.value?.reset() // 调用子组件 reset
}

const handleValidate = async () => { // 单独校验
  const valid = await formRef.value?.validate()
  result.value = valid ? '校验通过' : '校验失败'
}
</script>

<style scoped>
.container {
  padding: 20px; /* 内边距 */
}

.toolbar {
  margin-bottom: 20px; /* 下边距 */
}

.result {
  margin-top: 20px; /* 上边距 */
}
</style>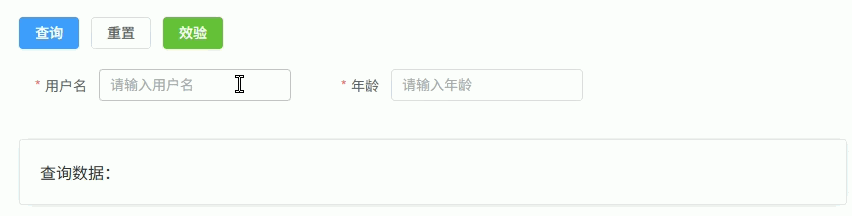
父子组件列表渲染与操作
在后台系统中,常见模式是:
- 父组件负责数据管理(CRUD)
- 子组件负责列表展示
- 子组件触发 编辑 / 删除 / 查看 等操作时,通过
emit通知父组件 - 父组件接收事件后执行具体逻辑
常见于:
- 表格组件封装
- 列表组件封装
- 通用 CRUD 组件
实现方式:
- 父组件
props传入数据数组 - 子组件
v-for渲染列表 - 子组件通过
emit返回操作结果
子组件 UserList.vue
<template>
  <el-table
    :data="list"
    border
    style="width: 100%"
  > <!-- ElementPlus 表格 -->

    <el-table-column prop="id" label="ID" width="80" /> <!-- ID列 -->

    <el-table-column prop="name" label="用户名" /> <!-- 用户名列 -->

    <el-table-column label="操作" width="200"> <!-- 操作列 -->
      <template #default="scope"> <!-- 获取当前行数据 -->

        <el-button
          type="primary"
          size="small"
          @click="handleEdit(scope.row)"
        >
          编辑
        </el-button>

        <el-button
          type="danger"
          size="small"
          @click="handleDelete(scope.row)"
        >
          删除
        </el-button>

      </template>
    </el-table-column>

  </el-table>
</template>

<script setup lang="ts">
interface User { // 用户类型
  id: number
  name: string
}

defineProps<{ // 接收父组件数据
  list: User[]
}>()

const emit = defineEmits<{
  (e: 'edit', row: User): void
  (e: 'delete', row: User): void
}>() // 定义事件

const handleEdit = (row: User) => { // 编辑事件
  emit('edit', row)
}

const handleDelete = (row: User) => { // 删除事件
  emit('delete', row)
}
</script>父组件 Parent.vue
<template>
  <div class="container"> <!-- 页面容器 -->

    <div class="toolbar"> <!-- 操作栏 -->

      <el-button type="primary" @click="handleAdd">
        新增
      </el-button>

    </div>

    <UserList
      :list="users"
      @edit="handleEdit"
      @delete="handleDelete"
    /> <!-- 列表组件 -->

  </div>
</template>

<script setup lang="ts">
import { ref } from 'vue'
import UserList from './UserList.vue'

interface User { // 用户类型
  id: number
  name: string
}

const users = ref<User[]>([ // 模拟数据
  { id: 1, name: 'Tom' },
  { id: 2, name: 'Jack' },
  { id: 3, name: 'Lucy' }
])

const handleAdd = () => { // 新增
  const id = users.value.length + 1
  users.value.push({
    id,
    name: 'NewUser' + id
  })
}

const handleEdit = (row: User) => { // 编辑
  row.name = row.name + '_edit'
}

const handleDelete = (row: User) => { // 删除
  users.value = users.value.filter(v => v.id !== row.id)
}
</script>

<style scoped>
.container {
  padding: 20px; /* 页面内边距 */
}

.toolbar {
  margin-bottom: 20px; /* 操作栏间距 */
}
</style>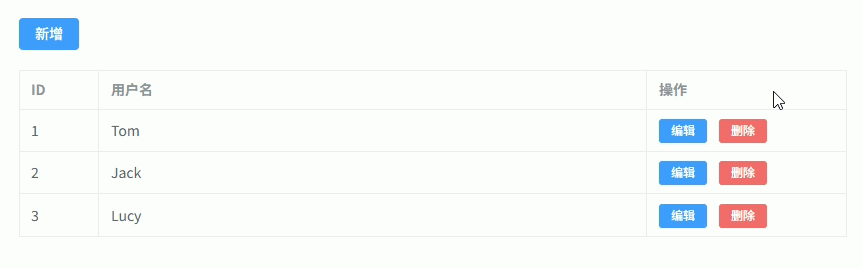
插槽传值(具名插槽 / 作用域插槽)
在组件封装中,经常需要 父组件控制子组件部分内容的渲染,这时使用 slot 插槽。
常见两种:
- 具名插槽(Named Slot) 父组件传入 模板内容,子组件在指定位置渲染。
- 作用域插槽(Scoped Slot) 子组件向父组件 传递数据,父组件决定如何渲染。
典型场景:
- Card组件(header / footer)
- Table组件(自定义列)
- Layout组件(header / sidebar / content)
子组件 BaseCard.vue
<template>
  <div class="card"> <!-- 卡片容器 -->

    <div class="card-header"> <!-- 头部区域 -->
      <slot name="header"></slot> <!-- 具名插槽 header -->
    </div>

    <div class="card-body"> <!-- 内容区域 -->
      <slot></slot> <!-- 默认插槽 -->
    </div>

    <div class="card-list"> <!-- 列表示例 -->
      <div
        v-for="item in list"
        :key="item.id"
        class="item"
      >
        <slot name="item" :row="item"></slot> <!-- 作用域插槽 -->
      </div>
    </div>

  </div>
</template>

<script setup lang="ts">
interface Item { // 列表类型
  id: number
  name: string
}

defineProps<{ // 接收父组件数据
  list: Item[]
}>()
</script>

<style scoped>
.card {
  border: 1px solid #ddd; /* 边框 */
  border-radius: 6px; /* 圆角 */
  padding: 16px; /* 内边距 */
}

.card-header {
  font-weight: bold; /* 字体加粗 */
  margin-bottom: 10px; /* 下边距 */
}

.card-body {
  margin-bottom: 10px; /* 下边距 */
}

.item {
  padding: 6px 0; /* 列表项内边距 */
}
</style>父组件 Parent.vue
<template>
  <BaseCard :list="list"> <!-- 使用组件 -->

    <template #header> <!-- 具名插槽 -->
      用户列表
    </template>

    <template #default> <!-- 默认插槽 -->
      这里是卡片内容区域
    </template>

    <template #item="{ row }"> <!-- 作用域插槽 -->
      <span style="margin-right: 10px">{{ row.name }}</span>

      <el-button
        type="primary"
        size="small"
        @click="handleClick(row)"
      >
        操作
      </el-button>

    </template>

  </BaseCard>
</template>

<script setup lang="ts">
import { ref } from 'vue'
import BaseCard from './BaseCard.vue'

interface Item { // 数据类型
  id: number
  name: string
}

const list = ref<Item[]>([ // 模拟数据
  { id: 1, name: 'Tom' },
  { id: 2, name: 'Jack' },
  { id: 3, name: 'Lucy' }
])

const handleClick = (row: Item) => { // 操作事件
  console.log('点击', row)
}
</script>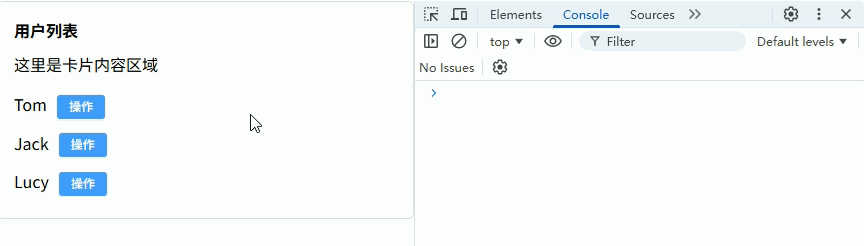
跨多层父子组件通信(provide / inject)
当组件层级很深时:
Parent
 └─ Child
└─ GrandChild如果使用 props + emit 逐层传递会非常麻烦,因此 Vue 提供:
- provide:祖先组件提供数据或方法
- inject:后代组件直接注入使用
特点:
- 可以跨 多层组件
- 不需要逐层传递
- 常用于 全局配置 / 表单上下文 / 组件库内部通信
父组件 Parent.vue(提供数据)
<template>
  <div class="container"> <!-- 页面容器 -->

    <h3>父组件</h3>

    <Child /> <!-- 子组件 -->

  </div>
</template>

<script setup lang="ts">
import { provide, ref } from 'vue'
import Child from './Child.vue'

const userName = ref('Tom') // 共享数据

const changeUser = () => { // 修改方法
  userName.value = 'Jack'
}

provide('userName', userName) // 提供数据
provide('changeUser', changeUser) // 提供方法
</script>

<style scoped>
.container {
  padding: 20px; /* 内边距 */
  border: 1px solid #ddd; /* 边框 */
}
</style>子组件 Child.vue(中间层)
<template>
  <div class="child"> <!-- 子组件容器 -->

    <h4>子组件</h4>

    <GrandChild /> <!-- 孙组件 -->

  </div>
</template>

<script setup lang="ts">
import GrandChild from './GrandChild.vue'
</script>

<style scoped>
.child {
  margin-top: 10px; /* 上边距 */
  padding: 10px; /* 内边距 */
  border: 1px dashed #999; /* 虚线边框 */
}
</style>孙组件 GrandChild.vue(注入使用)
<template>
  <div class="grand"> <!-- 孙组件 -->

    <p>用户名:{{ userName }}</p> <!-- 显示数据 -->

    <el-button
      type="primary"
      @click="changeUser"
    >
      修改用户名
    </el-button>

  </div>
</template>

<script setup lang="ts">
import { inject, Ref } from 'vue'

const userName = inject<Ref<string>>('userName')! // 注入数据

const changeUser = inject<() => void>('changeUser')! // 注入方法
</script>

<style scoped>
.grand {
  margin-top: 10px; /* 上边距 */
  padding: 10px; /* 内边距 */
  border: 1px solid #409eff; /* 边框 */
}
</style>
组合式 API + ref / reactive 共享状态
在 Vue3 中,可以把 响应式状态抽离到组合式函数(composable) 中,然后在父组件和子组件中 共同使用同一个状态对象。
特点:
- 使用
ref/reactive创建共享状态 - 抽离到
useXXX.ts - 父组件和子组件同时使用
- 状态实时联动
常见场景:
- 表单状态管理
- 全局筛选条件
- 表格 + 查询条件联动
组合式函数 useCounter.ts
import { ref } from 'vue'

const count = ref(0) // 共享状态

const increment = () => { // 增加
  count.value++
}

const decrement = () => { // 减少
  count.value--
}

export function useCounter() { // 导出组合函数
  return {
    count,
    increment,
    decrement
  }
}父组件 Parent.vue
<template>
  <div class="container"> <!-- 页面容器 -->

    <h3>父组件</h3>

    <p>Count:{{ count }}</p> <!-- 显示共享状态 -->

    <el-button type="primary" @click="increment">
      +1
    </el-button>

    <el-button @click="decrement">
      -1
    </el-button>

    <Child /> <!-- 子组件 -->

  </div>
</template>

<script setup lang="ts">
import Child from './Child.vue'
import { useCounter } from './useCounter'

const { count, increment, decrement } = useCounter() // 使用共享状态
</script>

<style scoped>
.container {
  padding: 20px; /* 内边距 */
  border: 1px solid #ddd; /* 边框 */
}
</style>子组件 Child.vue
<template>
  <div class="child"> <!-- 子组件容器 -->

    <h4>子组件</h4>

    <p>Count:{{ count }}</p> <!-- 显示共享状态 -->

    <el-button type="success" @click="increment">
      子组件 +1
    </el-button>

  </div>
</template>

<script setup lang="ts">
import { useCounter } from './useCounter'

const { count, increment } = useCounter() // 使用同一个状态
</script>

<style scoped>
.child {
  margin-top: 20px; /* 上边距 */
  padding: 15px; /* 内边距 */
  border: 1px dashed #999; /* 虚线边框 */
}
</style>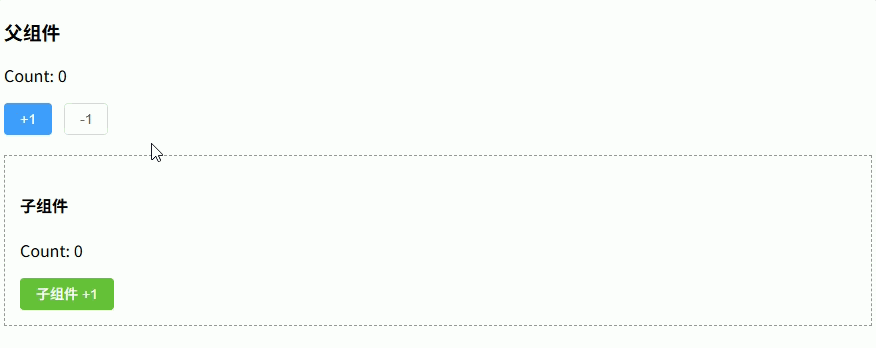
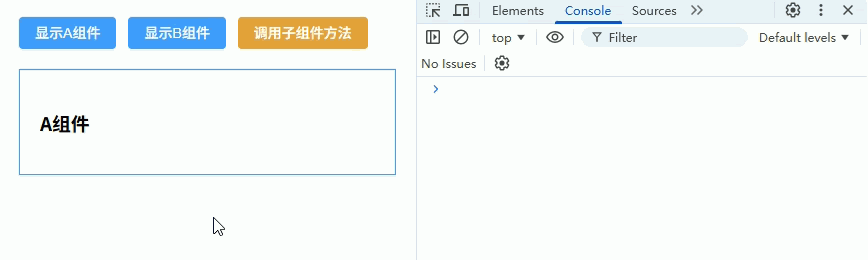
父子组件动态渲染组件(动态组件 + ref 调用)
在实际项目中,经常需要 根据条件渲染不同组件,例如:
- Tab 页面切换
- 不同类型表单
- 插件式组件
- 不同业务模块
实现方式:
- 使用
component+:is动态渲染组件 - 使用
ref获取当前组件实例 - 子组件使用
defineExpose暴露方法 - 父组件调用当前组件的方法
子组件 AComponent.vue
<template>
  <div class="box">
    <h3>A组件</h3>
  </div>
</template>

<script setup lang="ts">
const sayHello = () => { // 子组件方法
  console.log('Hello from AComponent')
}

defineExpose({ // 暴露方法给父组件
  sayHello
})
</script>

<style scoped>
.box {
  padding: 20px; /* 内边距 */
  border: 1px solid #409eff; /* 边框 */
}
</style>子组件 BComponent.vue
<template>
  <div class="box">
    <h3>B组件</h3>
  </div>
</template>

<script setup lang="ts">
const sayHello = () => { // 子组件方法
  console.log('Hello from BComponent')
}

defineExpose({ // 暴露方法给父组件
  sayHello
})
</script>

<style scoped>
.box {
  padding: 20px; /* 内边距 */
  border: 1px solid #67c23a; /* 边框 */
}
</style>父组件 Parent.vue
<template>
  <div class="container"> <!-- 页面容器 -->

    <div class="toolbar"> <!-- 操作区域 -->

      <el-button type="primary" @click="current = 'AComponent'">
        显示A组件
      </el-button>

      <el-button type="success" @click="current = 'BComponent'">
        显示B组件
      </el-button>

      <el-button type="warning" @click="callChildMethod">
        调用子组件方法
      </el-button>

    </div>

    <component
      :is="components[current]"
      ref="componentRef"
    /> <!-- 动态组件 -->

  </div>
</template>

<script setup lang="ts">
import { ref } from 'vue'
import AComponent from './AComponent.vue'
import BComponent from './BComponent.vue'

const components = { // 组件映射表
  AComponent,
  BComponent
}

const current = ref<keyof typeof components>('AComponent') // 当前组件

const componentRef = ref<any>() // 当前组件实例

const callChildMethod = () => { // 调用子组件方法
  componentRef.value?.sayHello()
}
</script>

<style scoped>
.container {
  padding: 20px; /* 内边距 */
}

.toolbar {
  margin-bottom: 20px; /* 下边距 */
}
</style>