微服务模块
在 IntelliJ IDEA 中创建微服务模块并使用。
父模块
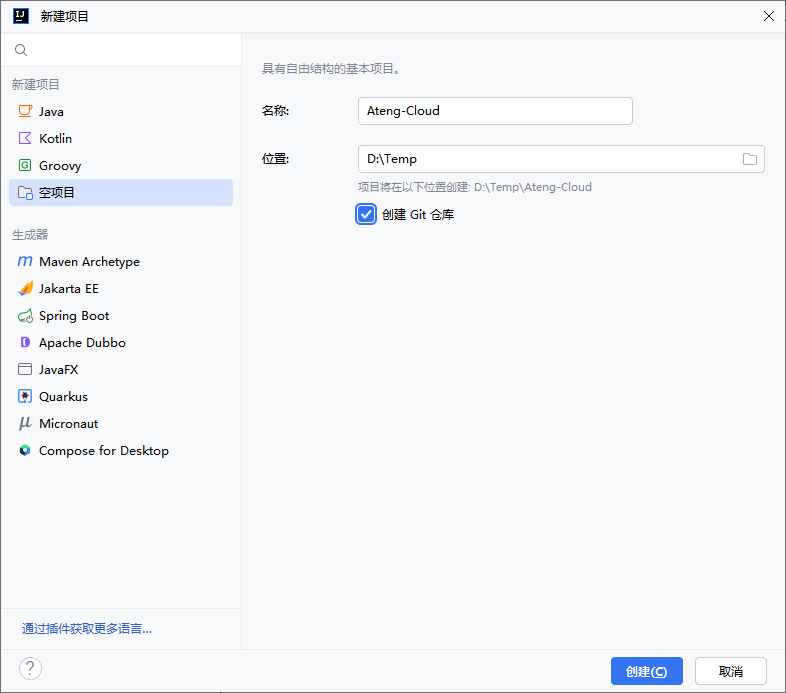
新建项目
新建项目,选择空项目,最后点击创建
创建 .gitignore
#忽略根目录下的所有文件
*

#忽略子目录下的所有文件
/*

#包含目录
!*/

#指定不忽略的文件
#!*.css
#!*.js
!*.html
!*.gif
!*.ico
!*.jpg
!*.svg
!*.png
!.nojekyll
!.gitignore
!*.md
!*.yaml
!*.yml
!*.sh
!*Dockerfile*
!*Jenkinsfile*
!*.java
!*.xml
!*.config
!*.iml
!*.imports
!*.sql
!banner.txt

#忽略根目录下的文件
/temp/
/logs/

#忽略特定文件夹名
tmp/
temp/
temporary/
other/
target/
logs/
.idea/创建 pom.xml
<?xml version="1.0" encoding="UTF-8"?>
<project xmlns:xsi="http://www.w3.org/2001/XMLSchema-instance" xmlns="http://maven.apache.org/POM/4.0.0"
xsi:schemaLocation="http://maven.apache.org/POM/4.0.0 https://maven.apache.org/xsd/maven-4.0.0.xsd">
<!-- 项目模型版本 -->
<modelVersion>4.0.0</modelVersion>
<!-- 项目坐标 -->
<groupId>io.github.kongyu666</groupId>
<artifactId>ateng-cloud</artifactId>
<version>${revision}</version>
<name>Ateng-Cloud</name>
<url>https://github.com/kongyu666/Ateng-Cloud</url>
<description>JDK21 SpringBoot3 SpringCloud Alibaba 微服务架构</description>
<!-- 打包方式为 POM,表示该项目为聚合项目 -->
<packaging>pom</packaging>
<!-- 项目包含的子模块 -->
<modules>
<module>ateng-common</module>
<module>ateng-gateway</module>
</modules>
<!-- 项目属性 -->
<properties>
<revision>1.0.0</revision>
<project.build.sourceEncoding>UTF-8</project.build.sourceEncoding>
<java.version>21</java.version>
<maven.compiler.source>21</maven.compiler.source>
<maven.compiler.target>21</maven.compiler.target>
<maven-compiler.version>3.12.1</maven-compiler.version>
<spring-boot.version>3.3.9</spring-boot.version>
<spring-cloud.version>2023.0.5</spring-cloud.version>
<spring-cloud-alibaba.version>2023.0.3.2</spring-cloud-alibaba.version>
</properties>
<!-- 项目环境配置 -->
<profiles>
<!-- 开发环境配置 -->
<profile>
<id>dev</id>
<activation>
<activeByDefault>true</activeByDefault>
</activation>
<properties>
<profiles.active>dev</profiles.active>
<profiles.desc>开发环境</profiles.desc>
<logging.level>info</logging.level>
</properties>
</profile>
<!-- 测试环境配置 -->
<profile>
<id>test</id>
<properties>
<profiles.active>test</profiles.active>
<profiles.desc>测试环境</profiles.desc>
<logging.level>info</logging.level>
</properties>
</profile>
<!-- 生产环境配置 -->
<profile>
<id>prod</id>
<properties>
<profiles.active>prod</profiles.active>
<profiles.desc>生产环境</profiles.desc>
<logging.level>warn</logging.level>
</properties>
</profile>
</profiles>
<!-- 依赖管理 -->
<dependencyManagement>
<dependencies>
<dependency>
<groupId>org.springframework.cloud</groupId>
<artifactId>spring-cloud-dependencies</artifactId>
<version>${spring-cloud.version}</version>
<type>pom</type>
<scope>import</scope>
</dependency>
<dependency>
<groupId>org.springframework.boot</groupId>
<artifactId>spring-boot-dependencies</artifactId>
<version>${spring-boot.version}</version>
<type>pom</type>
<scope>import</scope>
</dependency>
<dependency>
<groupId>com.alibaba.cloud</groupId>
<artifactId>spring-cloud-alibaba-dependencies</artifactId>
<version>${spring-cloud-alibaba.version}</version>
<type>pom</type>
<scope>import</scope>
</dependency>
</dependencies>
</dependencyManagement>
<!-- 插件仓库配置 -->
<repositories>
<!-- Central Repository -->
<repository>
<id>central</id>
<name>阿里云中央仓库</name>
<url>https://maven.aliyun.com/repository/central</url>
<!--<name>Maven官方中央仓库</name>
<url>https://repo.maven.apache.org/maven2/</url>-->
</repository>
</repositories>
<!-- 构建配置 -->
<build>
<finalName>${project.name}-${project.version}</finalName>
<plugins>
<!-- Maven 编译插件 -->
<plugin>
<groupId>org.apache.maven.plugins</groupId>
<artifactId>maven-compiler-plugin</artifactId>
<version>${maven-compiler.version}</version>
<configuration>
<source>${java.version}</source>
<target>${java.version}</target>
<encoding>${project.build.sourceEncoding}</encoding>
<!-- 编译参数 -->
<compilerArgs>
<!-- 启用Java 8参数名称保留功能 -->
<arg>-parameters</arg>
</compilerArgs>
</configuration>
</plugin>
</plugins>
<resources>
<!-- 第一个资源配置块 -->
<resource>
<directory>src/main/resources</directory>
<filtering>false</filtering>
</resource>
<!-- 第二个资源配置块 -->
<resource>
<directory>src/main/resources</directory>
<includes>
<include>application*</include>
<include>bootstrap*.yml</include>
<include>common*</include>
<include>banner*</include>
</includes>
<filtering>true</filtering>
</resource>
</resources>
</build>
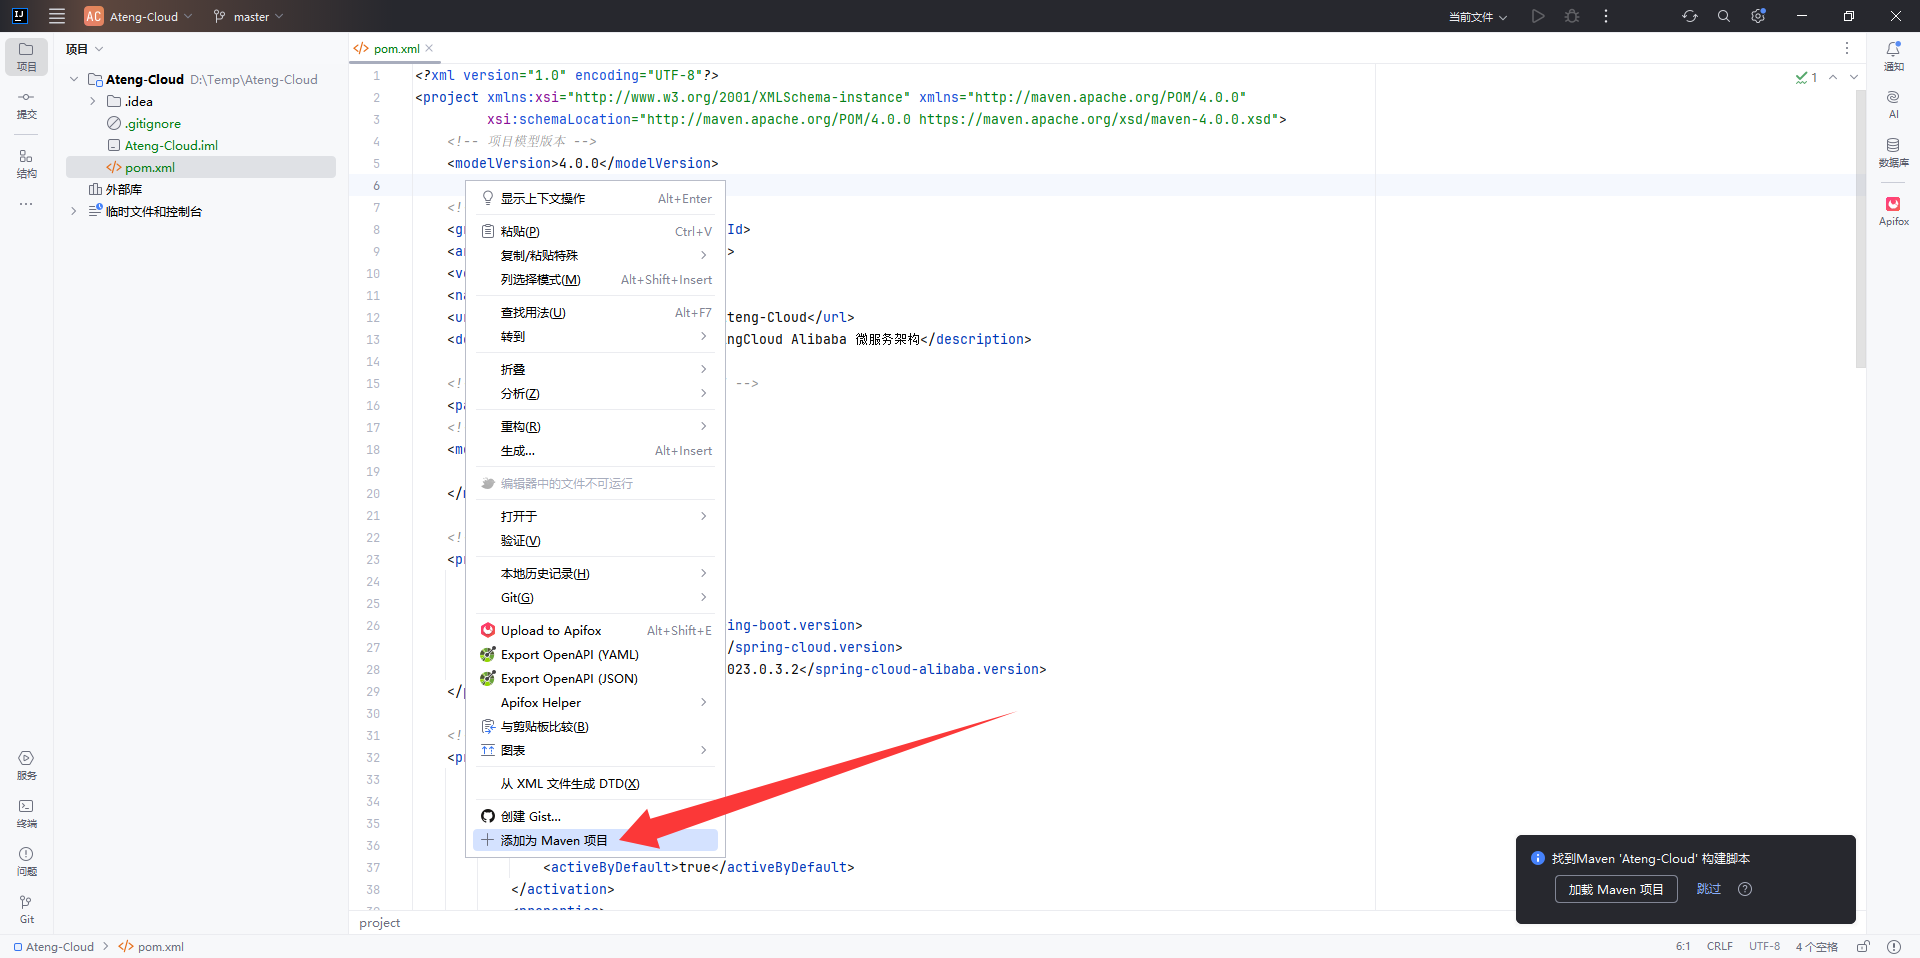
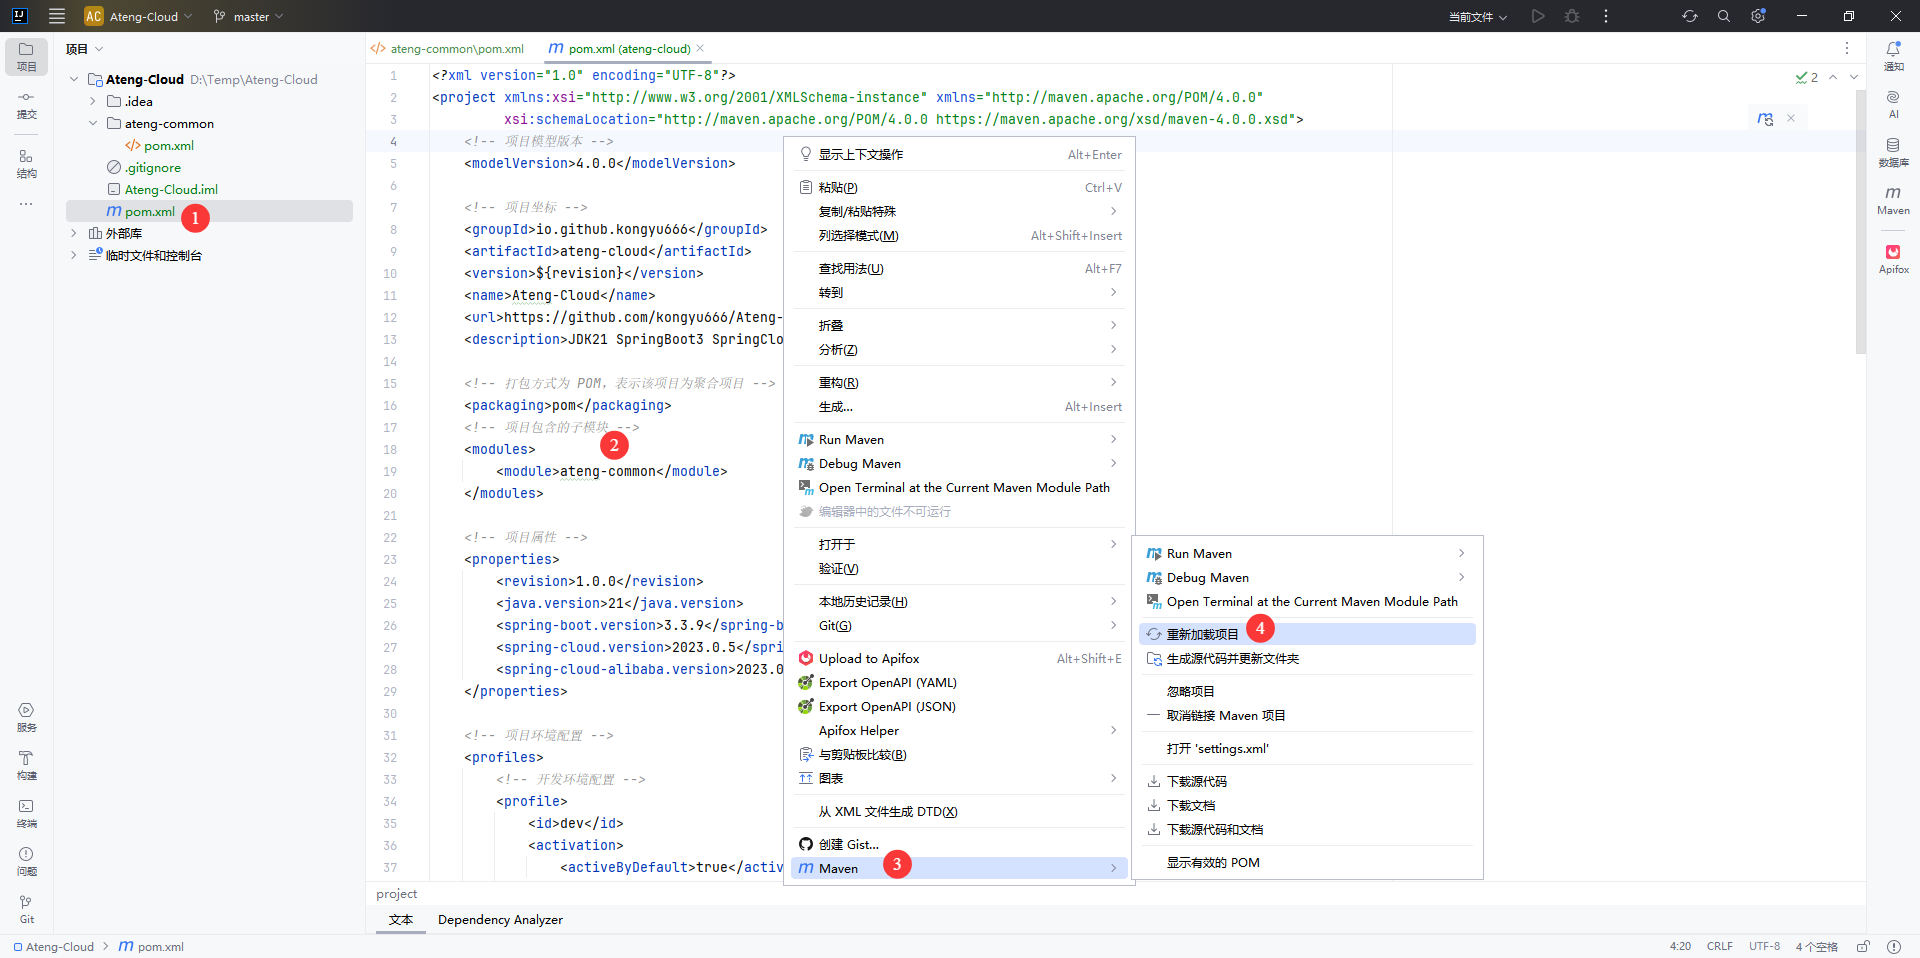
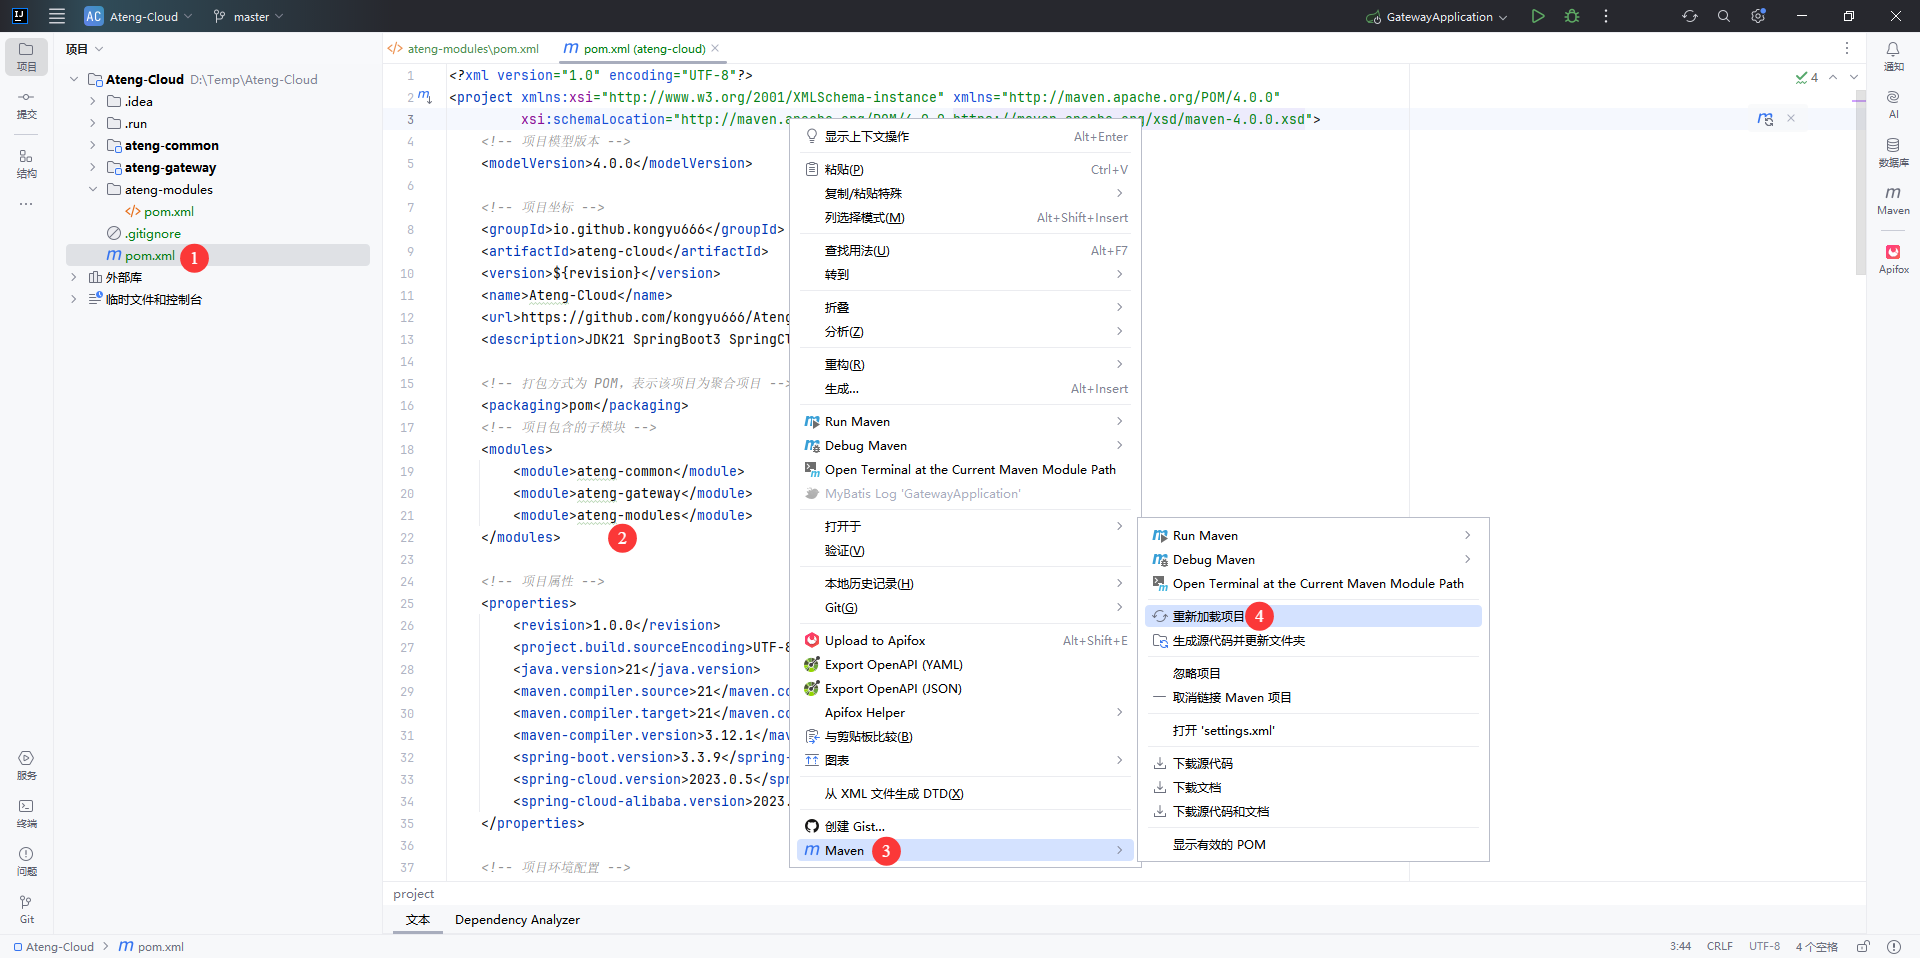
</project>添加为 Maven 项目
在 pom.xml 文件中,右键点击 添加为 Maven 项目
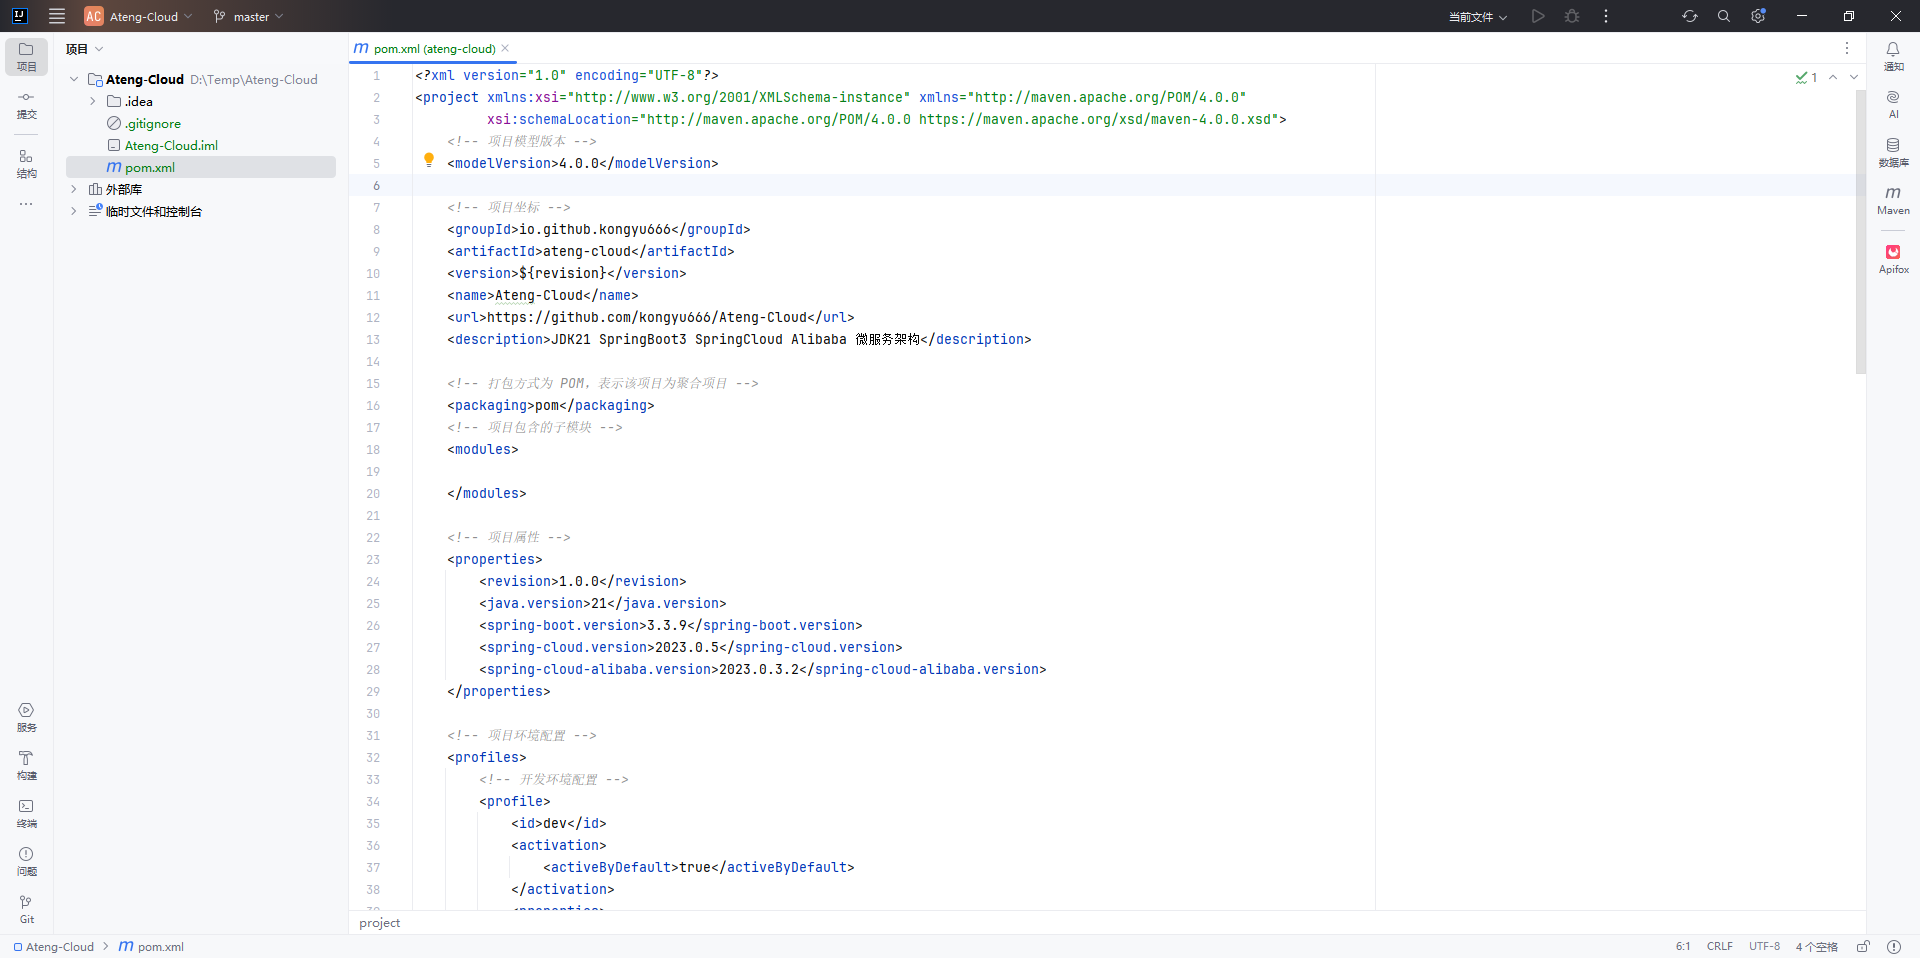
最终父模块创建完成后如下图所示
公共父模块
创建目录
创建 公共父模块 目录

创建 pom.xml
<?xml version="1.0" encoding="UTF-8"?>
<project xmlns:xsi="http://www.w3.org/2001/XMLSchema-instance" xmlns="http://maven.apache.org/POM/4.0.0"
         xsi:schemaLocation="http://maven.apache.org/POM/4.0.0 https://maven.apache.org/xsd/maven-4.0.0.xsd">
    <!-- 项目模型版本 -->
    <modelVersion>4.0.0</modelVersion>

    <!-- 父模块 -->
    <parent>
        <groupId>io.github.kongyu666</groupId>
        <artifactId>ateng-cloud</artifactId>
        <version>${revision}</version>
    </parent>

    <!-- 项目坐标 -->
    <artifactId>ateng-common</artifactId>
    <description>
        ateng-common 通用模块
    </description>

    <!-- 打包方式为 POM,表示该项目为聚合项目 -->
    <packaging>pom</packaging>
    <!-- 项目包含的子模块 -->
    <modules>

    </modules>

</project>添加模块
在父模块中添加公共父模块,然后点击再重新加载项目
<modules>
    <module>ateng-common</module>
</modules>最终公共父模块创建完成后如下图所示
公共子模块
Nacos模块
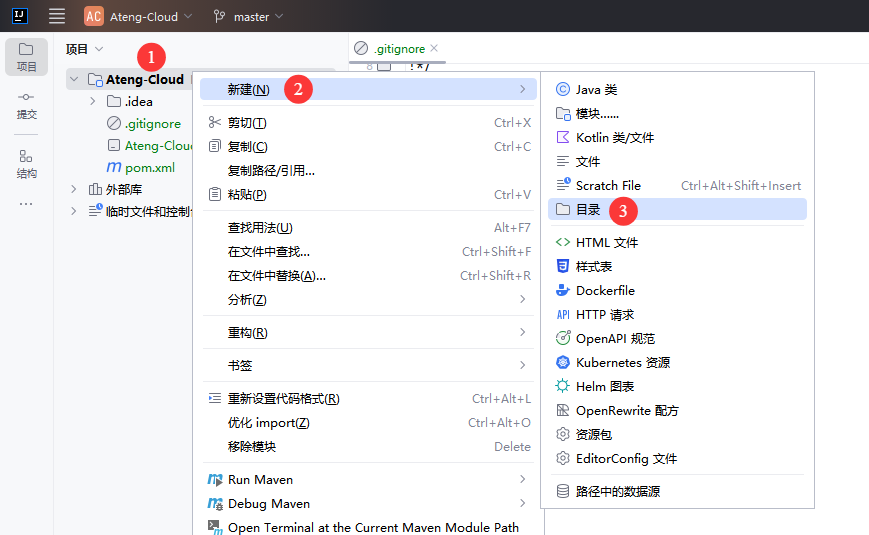
创建模块
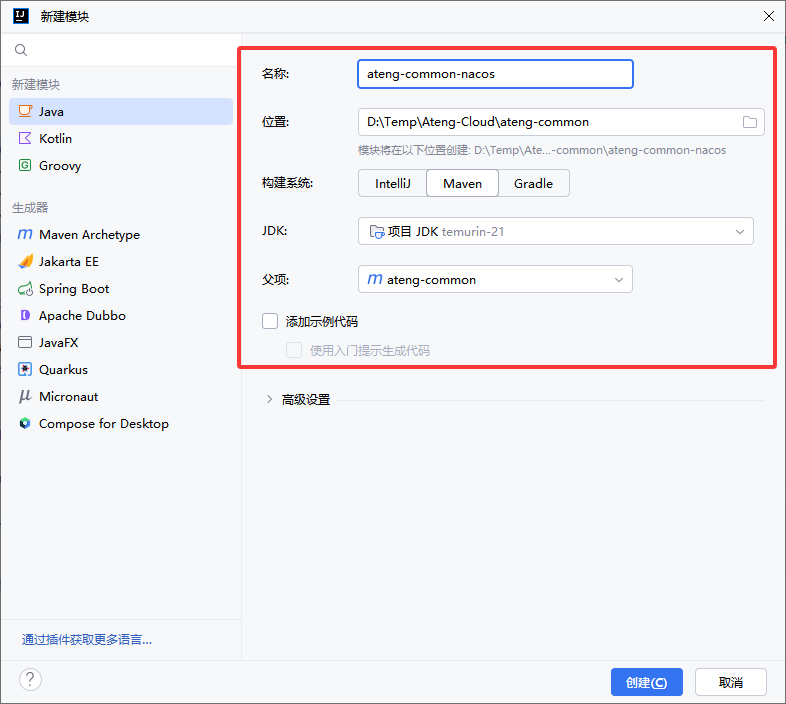
在 公共父模块 中创建 Nacos 模块
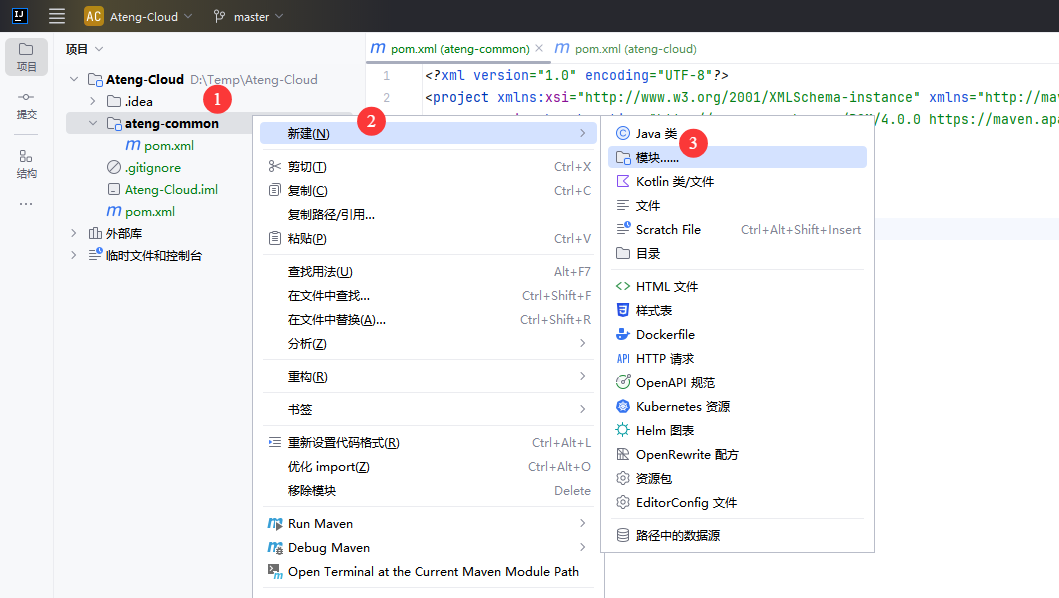
选择 Java,输入公共子模块名称
修改 pom.xml
<?xml version="1.0" encoding="UTF-8"?>
<project xmlns:xsi="http://www.w3.org/2001/XMLSchema-instance" xmlns="http://maven.apache.org/POM/4.0.0"
         xsi:schemaLocation="http://maven.apache.org/POM/4.0.0 https://maven.apache.org/xsd/maven-4.0.0.xsd">
    <!-- 项目模型版本 -->
    <modelVersion>4.0.0</modelVersion>

    <!-- 父模块 -->
    <parent>
        <groupId>io.github.kongyu666</groupId>
        <artifactId>ateng-common</artifactId>
        <version>${revision}</version>
    </parent>

    <!-- 项目坐标 -->
    <artifactId>ateng-common-nacos</artifactId>
    <description>
        ateng-common-nacos 公共模块-Nacos模块,服务发现、配置管理
    </description>

    <!-- 服务依赖 -->
    <dependencies>

        <!-- Nacos 服务发现的依赖 -->
        <dependency>
            <groupId>com.alibaba.cloud</groupId>
            <artifactId>spring-cloud-starter-alibaba-nacos-discovery</artifactId>
        </dependency>

        <!-- Nacos 配置管理的依赖 -->
        <dependency>
            <groupId>com.alibaba.cloud</groupId>
            <artifactId>spring-cloud-starter-alibaba-nacos-config</artifactId>
        </dependency>

    </dependencies>

</project>添加模块
在公共父模块中添加公共子模块Nacos,然后点击再重新加载项目
<modules>
    <module>ateng-common-nacos</module>
</modules>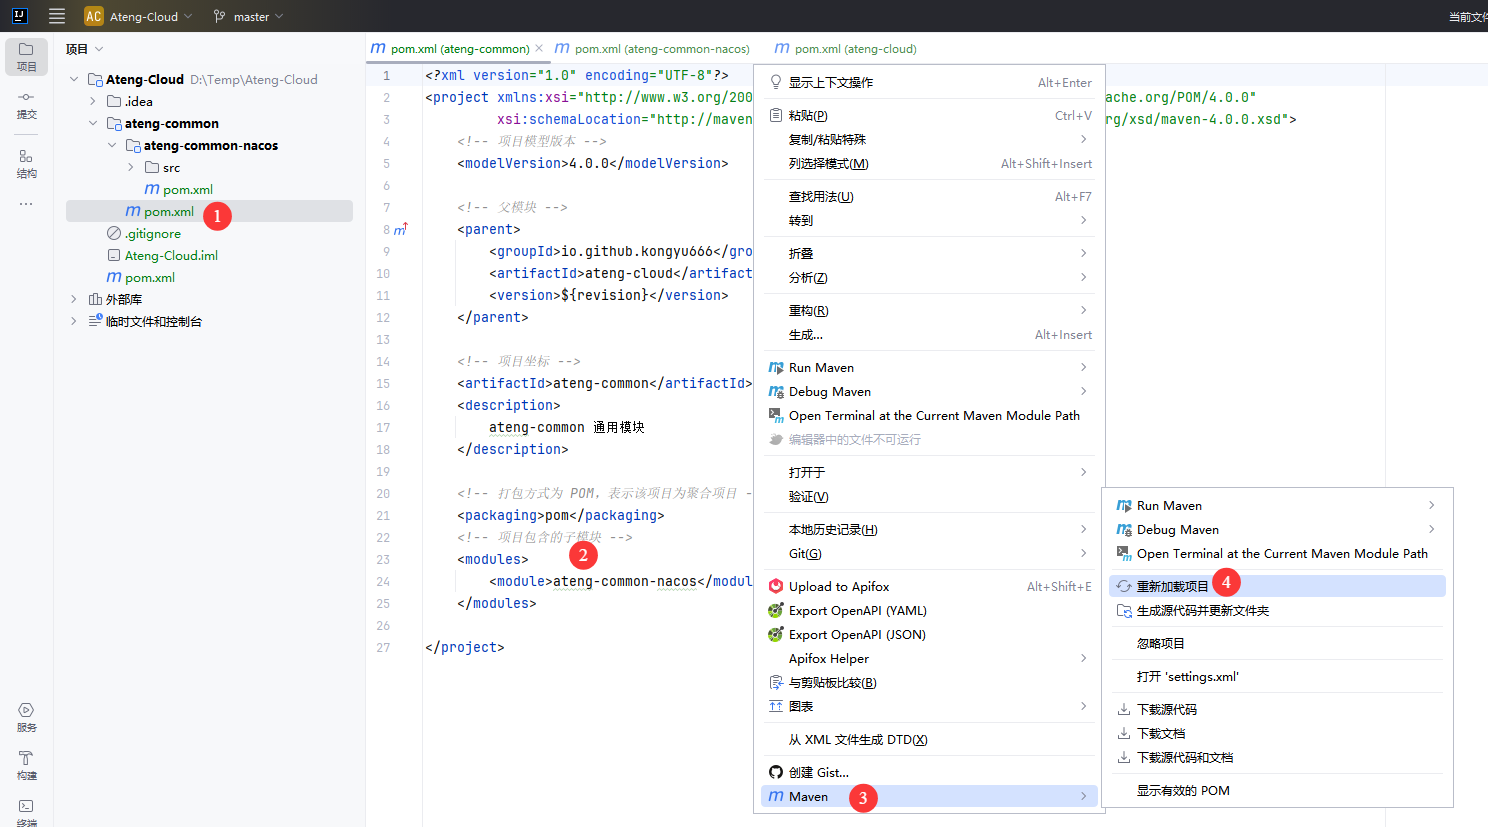
最终公共子模块创建完成后如下图所示

网关模块
创建模块
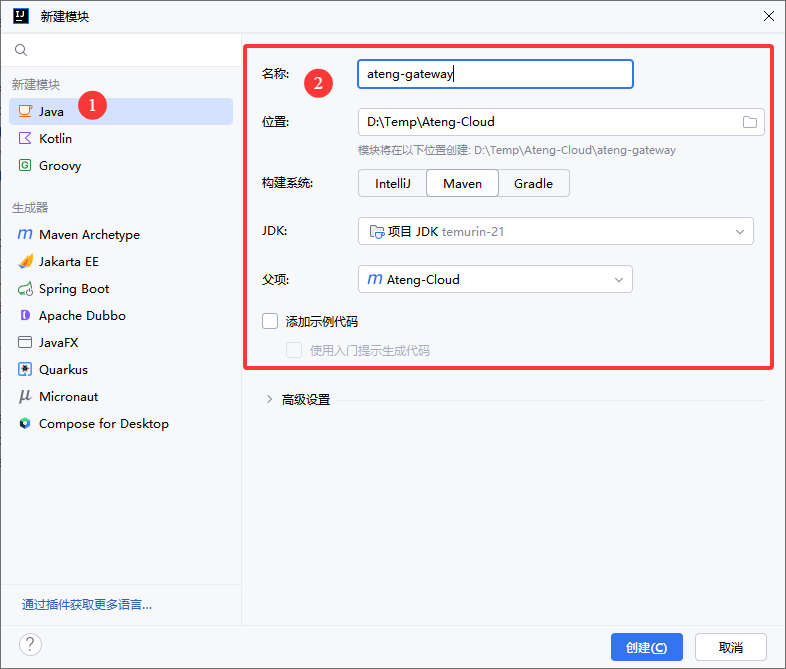
在 父模块 中创建 网关 模块
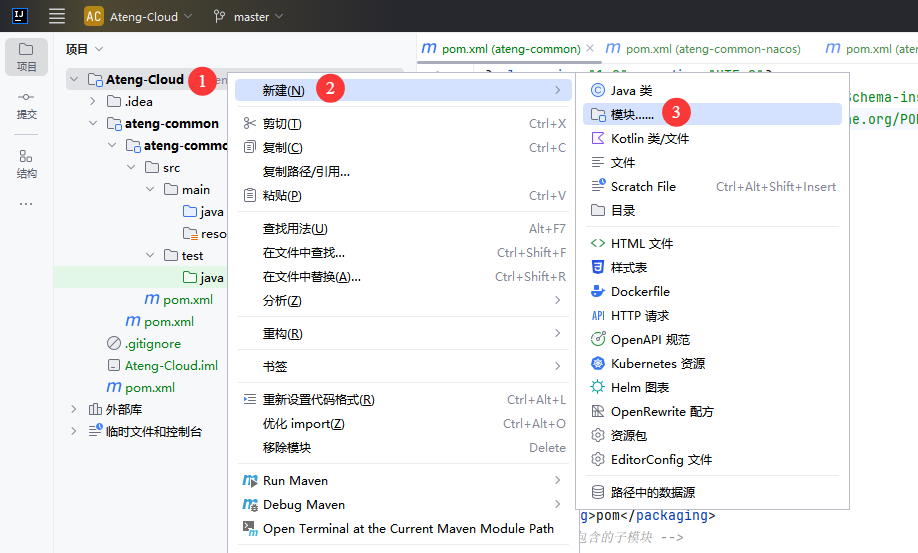
选择 Java,输入模块名称
修改 pom.xml
<?xml version="1.0" encoding="UTF-8"?>
<project xmlns:xsi="http://www.w3.org/2001/XMLSchema-instance" xmlns="http://maven.apache.org/POM/4.0.0"
         xsi:schemaLocation="http://maven.apache.org/POM/4.0.0 https://maven.apache.org/xsd/maven-4.0.0.xsd">
    <!-- 项目模型版本 -->
    <modelVersion>4.0.0</modelVersion>

    <!-- 父模块 -->
    <parent>
        <groupId>io.github.kongyu666</groupId>
        <artifactId>ateng-cloud</artifactId>
        <version>${revision}</version>
    </parent>

    <!-- 项目坐标 -->
    <artifactId>ateng-gateway</artifactId>
    <description>
        ateng-gateway 网关模块
    </description>

    <!-- 服务依赖 -->
    <dependencies>

        <!-- Spring Cloud Gateway 启动器依赖,用于构建API网关 -->
        <dependency>
            <groupId>org.springframework.cloud</groupId>
            <artifactId>spring-cloud-starter-gateway</artifactId>
        </dependency>

        <!-- Spring Cloud 负载均衡启动器依赖,用于客户端负载均衡 -->
        <dependency>
            <groupId>org.springframework.cloud</groupId>
            <artifactId>spring-cloud-starter-loadbalancer</artifactId>
        </dependency>

        <!-- ateng-common-nacos 公共模块-Nacos模块,服务发现、配置管理 -->
        <dependency>
            <groupId>io.github.kongyu666</groupId>
            <artifactId>ateng-common-nacos</artifactId>
            <version>${revision}</version>
        </dependency>

    </dependencies>

    <!-- 构建配置 -->
    <build>
        <plugins>
            <!-- Spring Boot Maven 插件 -->
            <plugin>
                <groupId>org.springframework.boot</groupId>
                <artifactId>spring-boot-maven-plugin</artifactId>
                <version>${spring-boot.version}</version>
                <executions>
                    <execution>
                        <id>repackage</id>
                        <goals>
                            <goal>repackage</goal>
                        </goals>
                    </execution>
                </executions>
            </plugin>
        </plugins>
    </build>

</project>添加模块
在父模块中添加子模块,然后点击再重新加载项目
<modules>
    <module>ateng-gateway</module>
</modules>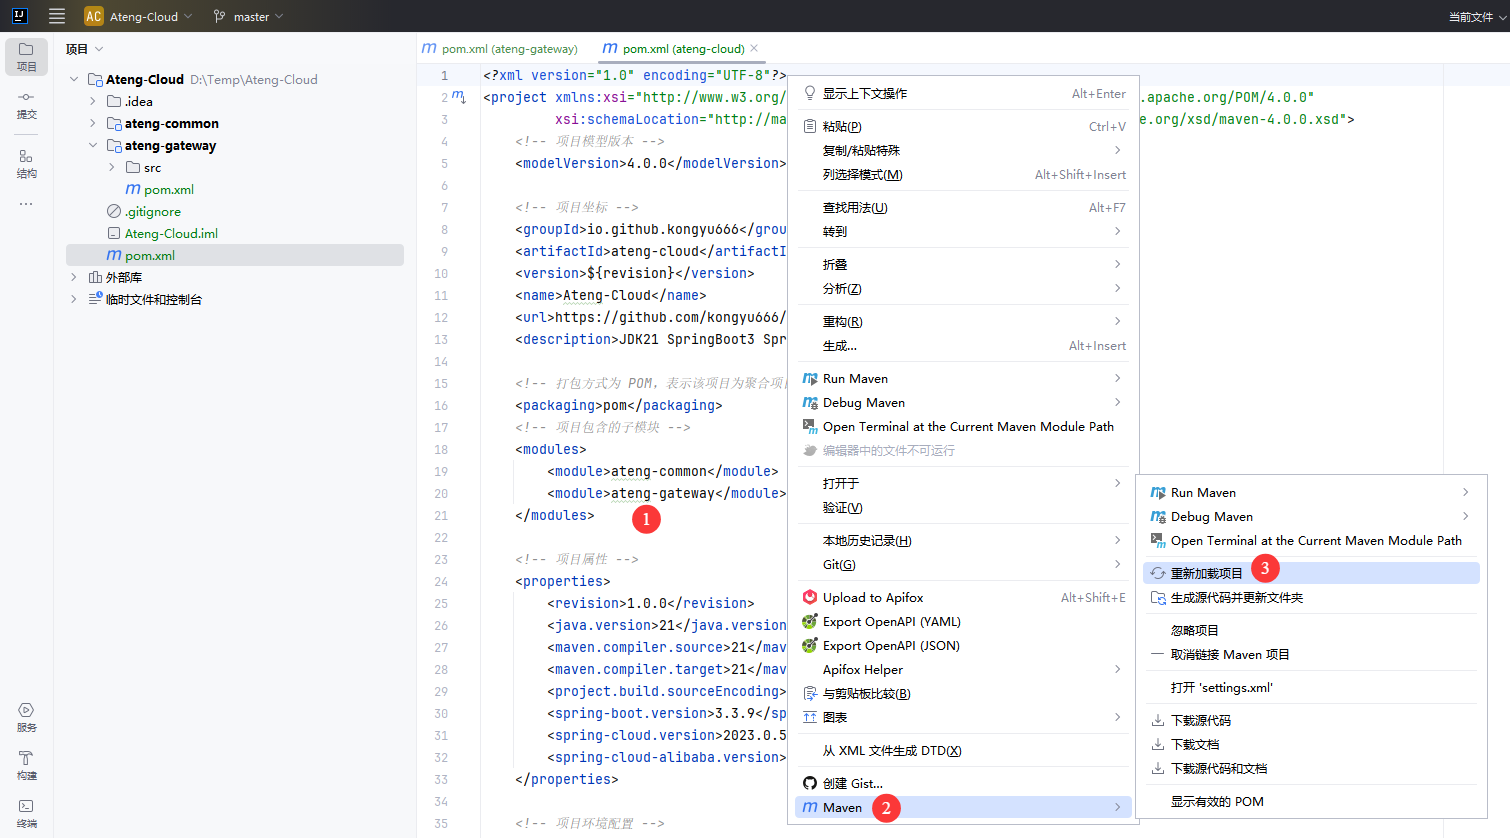
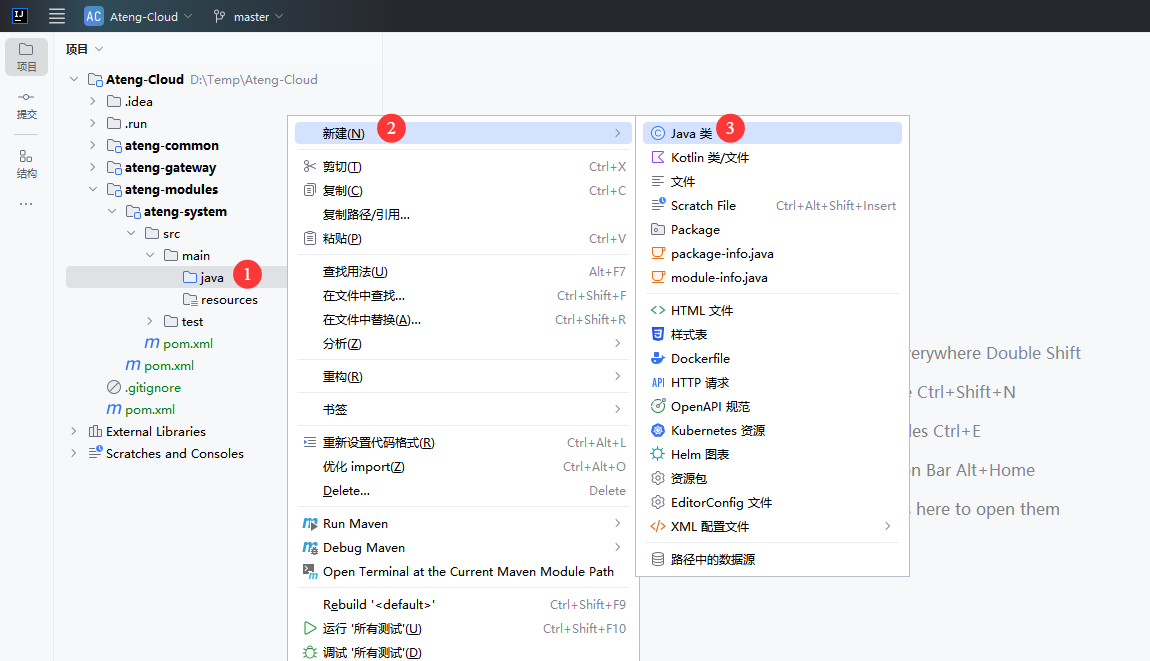
创建Application
新建 Java 类,创建 Application

输入包名和类名
io.github.kongyu666.gateway.GatewayApplication修改application
package io.github.kongyu666.gateway;

import org.springframework.boot.SpringApplication;
import org.springframework.boot.autoconfigure.SpringBootApplication;
import org.springframework.cloud.client.discovery.EnableDiscoveryClient;

@SpringBootApplication
@EnableDiscoveryClient // 启动Nacos服务发现
public class GatewayApplication {

    public static void main(String[] args) {
        SpringApplication.run(GatewayApplication.class, args);
    }

}创建配置
新建 配置文件
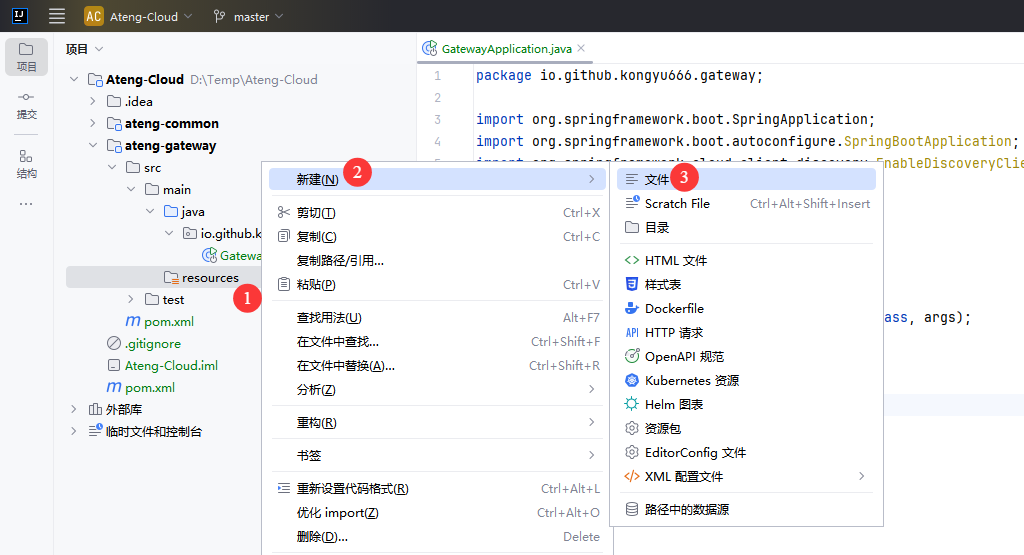
创建 application.yml
server:
  port: 16801
  servlet:
    context-path: /
spring:
  main:
    web-application-type: reactive
  application:
    name: ${project.artifactId}
---
# 环境配置
spring:
  profiles:
    active: @profiles.active@
desc: @profiles.desc@创建 application-dev.yml
# nacos 配置
spring:
  cloud:
    nacos:
      # nacos:8848 服务地址
      server-addr: 192.168.1.10:30648
      username: nacos
      password: Admin@123
      discovery:
        # 注册组
        group: ${spring.profiles.active}
        namespace: a8126e6d-5758-4f5b-b892-2522a250074c
      config:
        # 配置组
        group: ${spring.profiles.active}
        namespace: a8126e6d-5758-4f5b-b892-2522a250074c
  config:
    import: # 引入配置nacos中的配置application-common.yml
      - optional:nacos:application-common.yml
- optional:nacos:${spring.application.name}.yml创建 banner.txt
         █████╗ ████████╗███████╗███╗   ██╗ ██████╗
        ██╔══██╗╚══██╔══╝██╔════╝████╗  ██║██╔════╝
        ███████║   ██║   █████╗  ██╔██╗ ██║██║  ███╗
        ██╔══██║   ██║   ██╔══╝  ██║╚██╗██║██║   ██║
        ██║  ██║   ██║   ███████╗██║ ╚████║╚██████╔╝
        ╚═╝  ╚═╝   ╚═╝   ╚══════╝╚═╝  ╚═══╝ ╚═════╝

${AnsiColor.CYAN}        Application Name:${AnsiColor.BLACK} ${AnsiColor.BRIGHT_GREEN}${spring.application.name:Ateng} ${AnsiColor.BLACK}
${AnsiColor.CYAN}        SpringBoot Version:${AnsiColor.BLACK} ${AnsiColor.BRIGHT_GREEN}${spring-boot.version} ${AnsiColor.BLACK}
${AnsiColor.CYAN}        Profiles Active:${AnsiColor.BLACK} ${AnsiColor.BRIGHT_GREEN}${spring.profiles.active:-} ${AnsiColor.BLACK}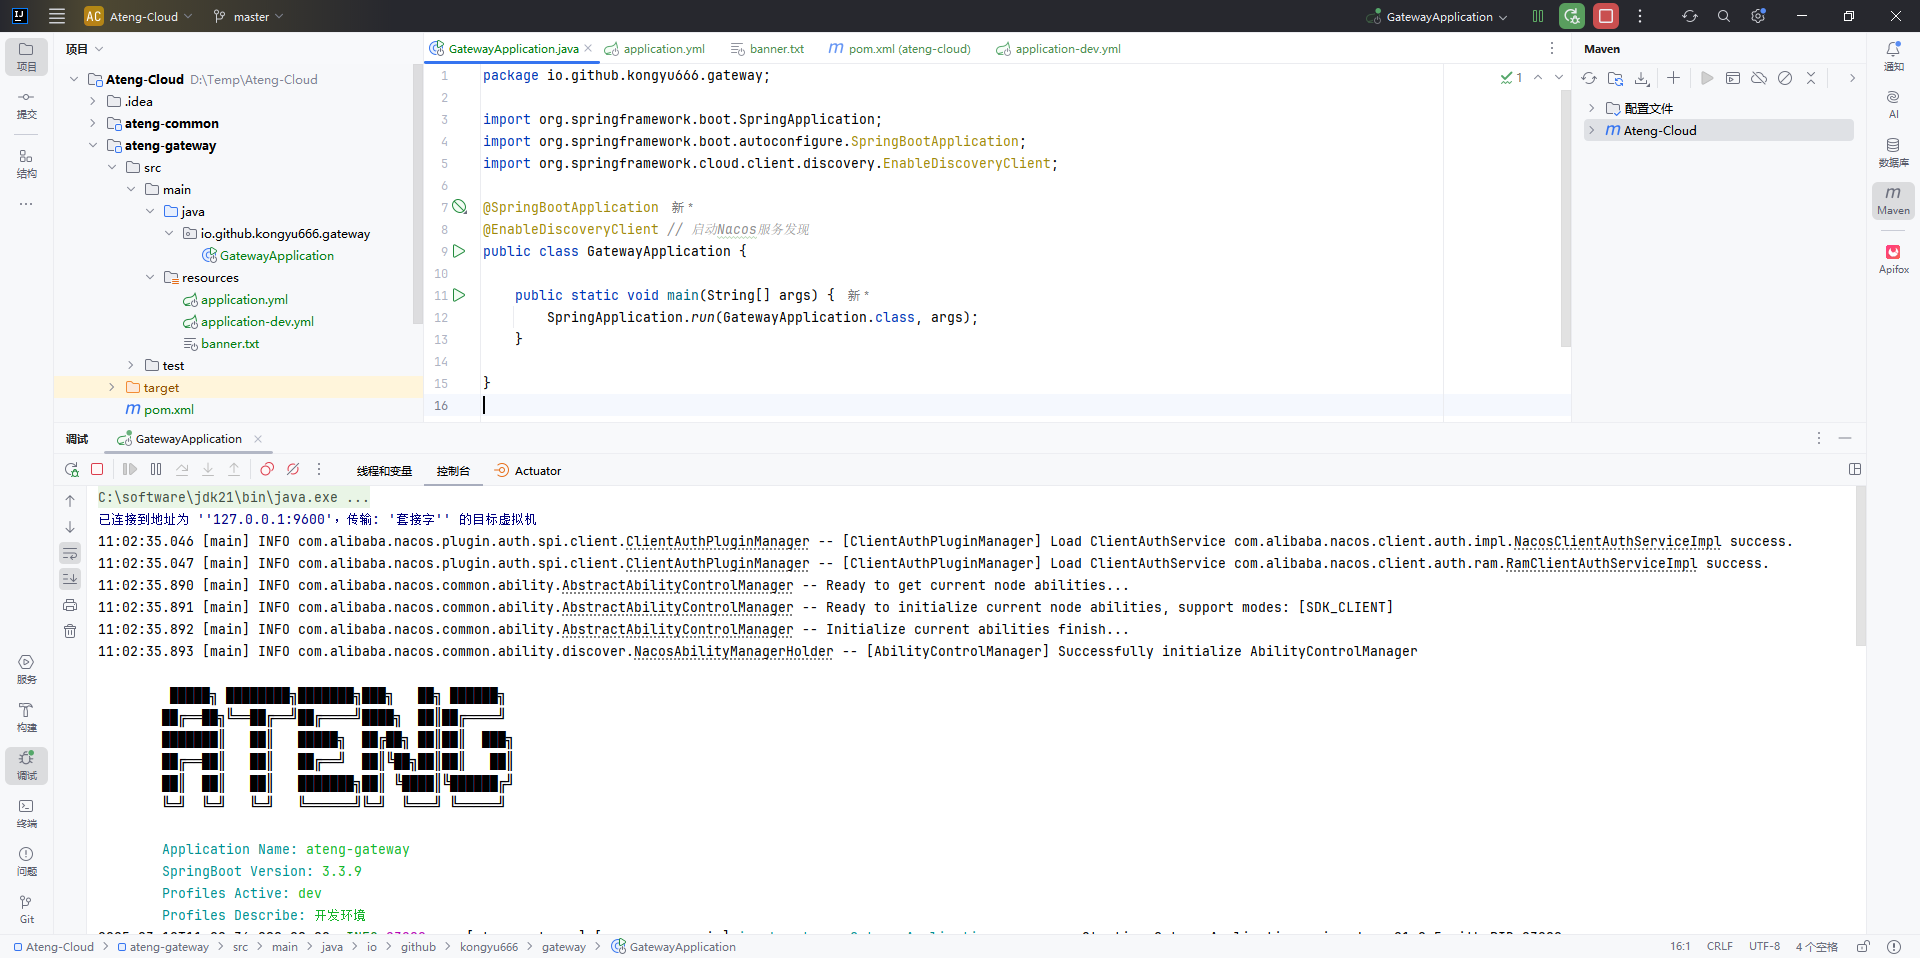
${AnsiColor.CYAN} Profiles Describe:${AnsiColor.BLACK} ${AnsiColor.BRIGHT_GREEN}${spring.profiles.desc:-} ${AnsiColor.BLACK}启动应用
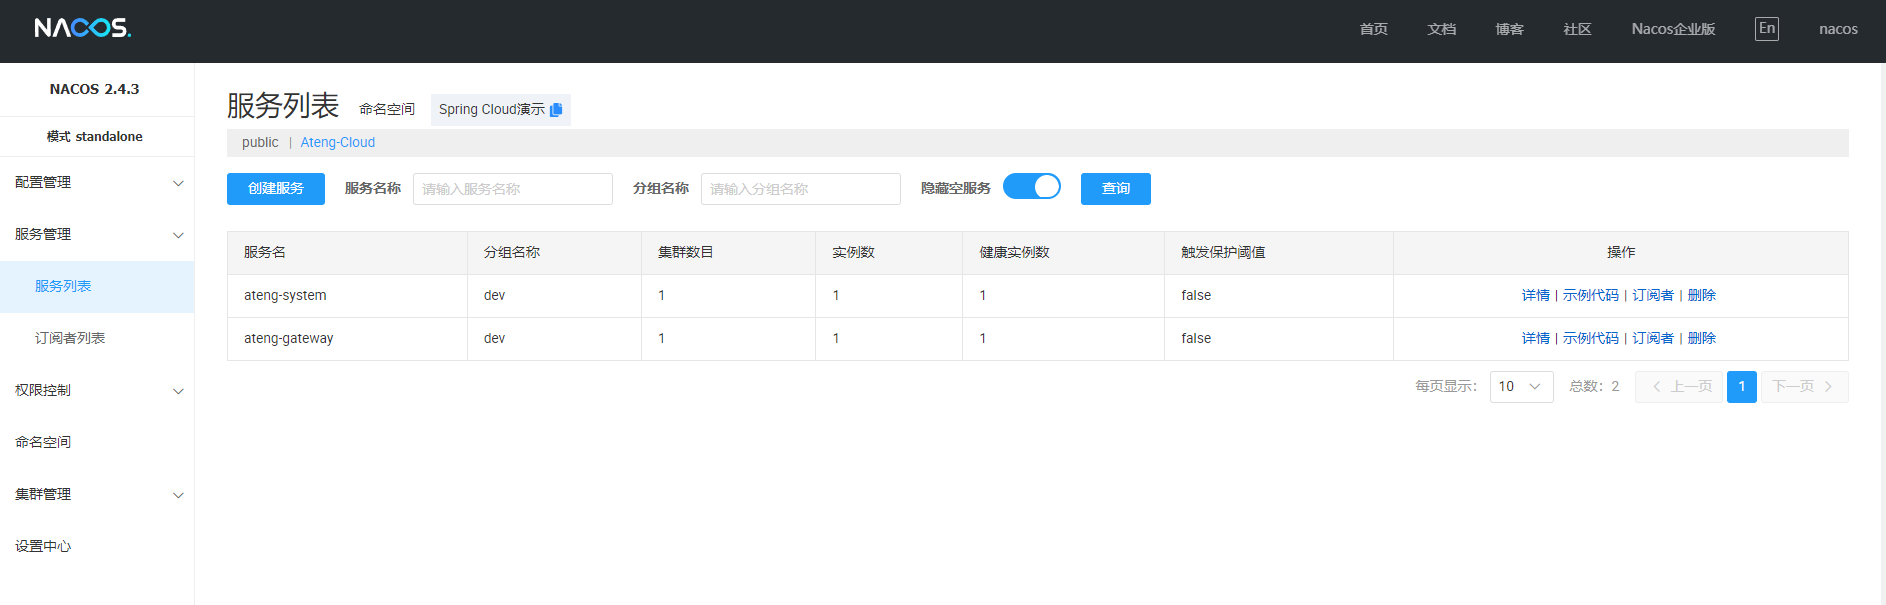
启动应用程序
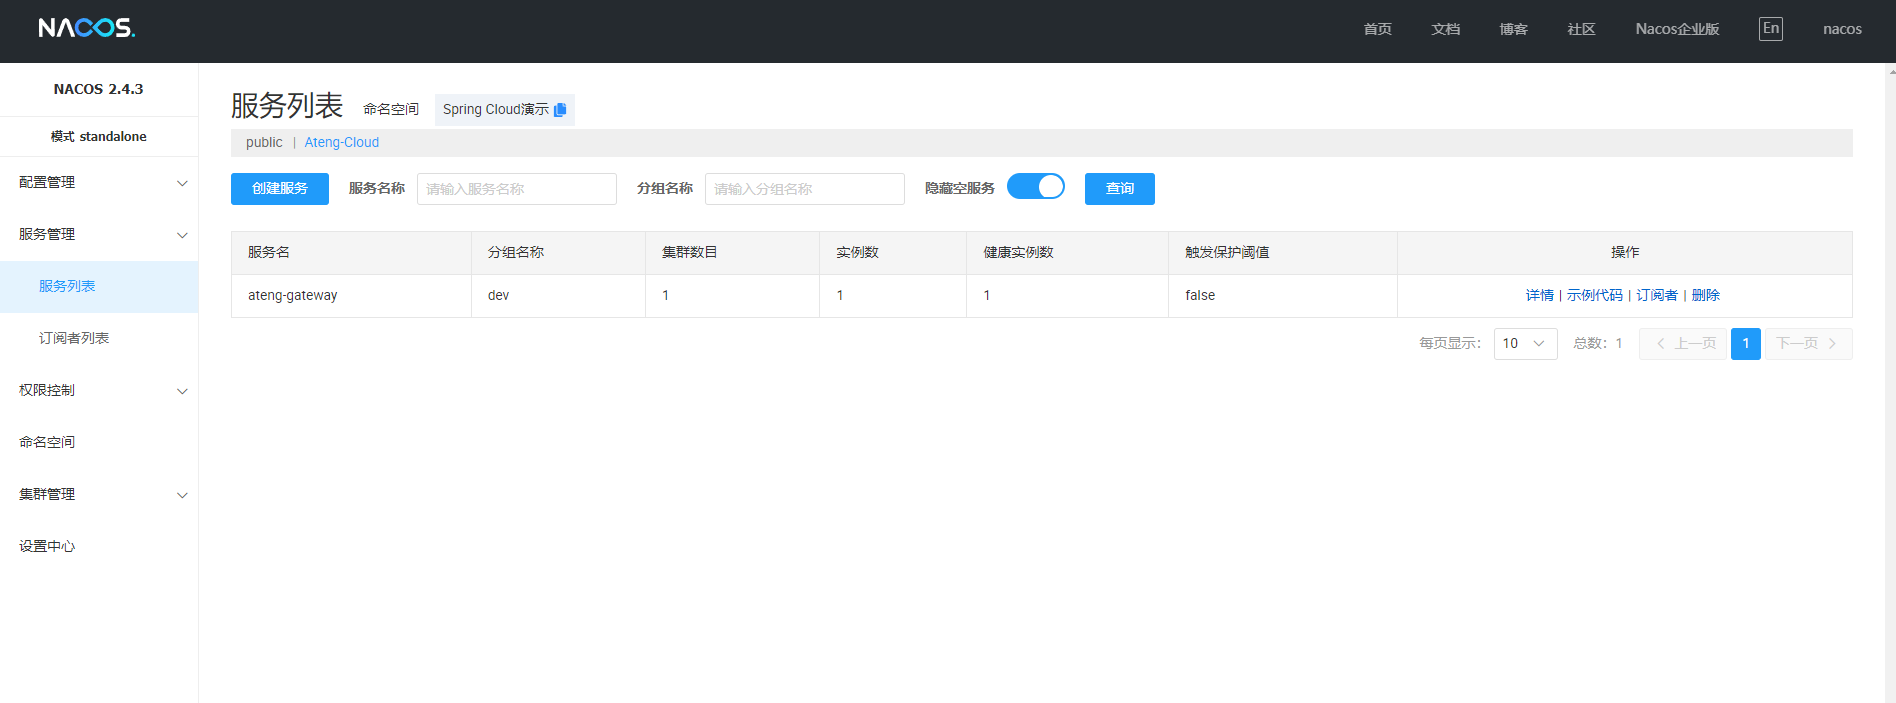
在Nacos中查看应用
业务父模块
创建目录
创建 业务父模块 目录
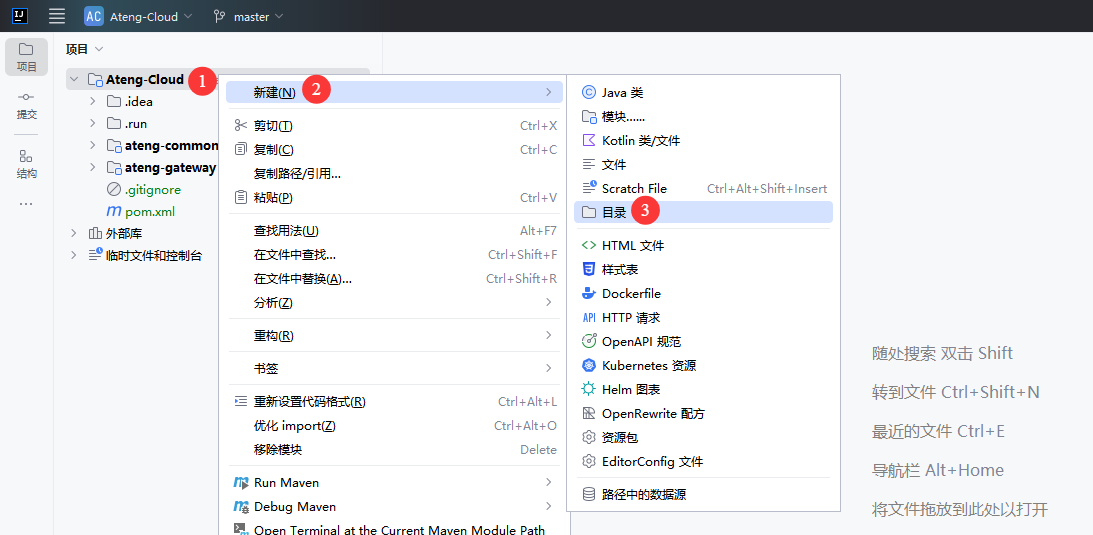

创建 pom.xml
<?xml version="1.0" encoding="UTF-8"?>
<project xmlns:xsi="http://www.w3.org/2001/XMLSchema-instance" xmlns="http://maven.apache.org/POM/4.0.0"
         xsi:schemaLocation="http://maven.apache.org/POM/4.0.0 https://maven.apache.org/xsd/maven-4.0.0.xsd">
    <!-- 项目模型版本 -->
    <modelVersion>4.0.0</modelVersion>

    <!-- 父模块 -->
    <parent>
        <groupId>io.github.kongyu666</groupId>
        <artifactId>ateng-cloud</artifactId>
        <version>${revision}</version>
    </parent>

    <!-- 项目坐标 -->
    <artifactId>ateng-modules</artifactId>
    <description>
        ateng-modules 业务模块,业务系统
    </description>

    <!-- 打包方式为 POM,表示该项目为聚合项目 -->
    <packaging>pom</packaging>
    <!-- 项目包含的子模块 -->
    <modules>

    </modules>

</project>添加模块
在父模块中添加业务父模块,然后点击再重新加载项目
<modules>
    <module>ateng-modules</module>
</modules>最终业务父模块创建完成后如下图所示
业务子模块
System模块
创建模块
在 业务父模块 中创建 system系统 模块
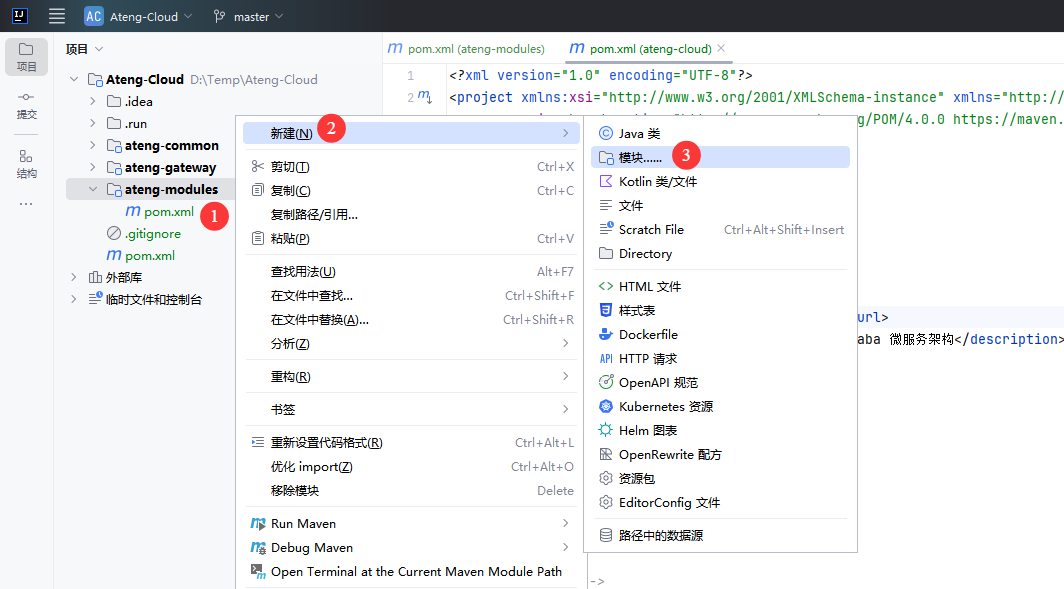
选择 Java,输入子模块名称
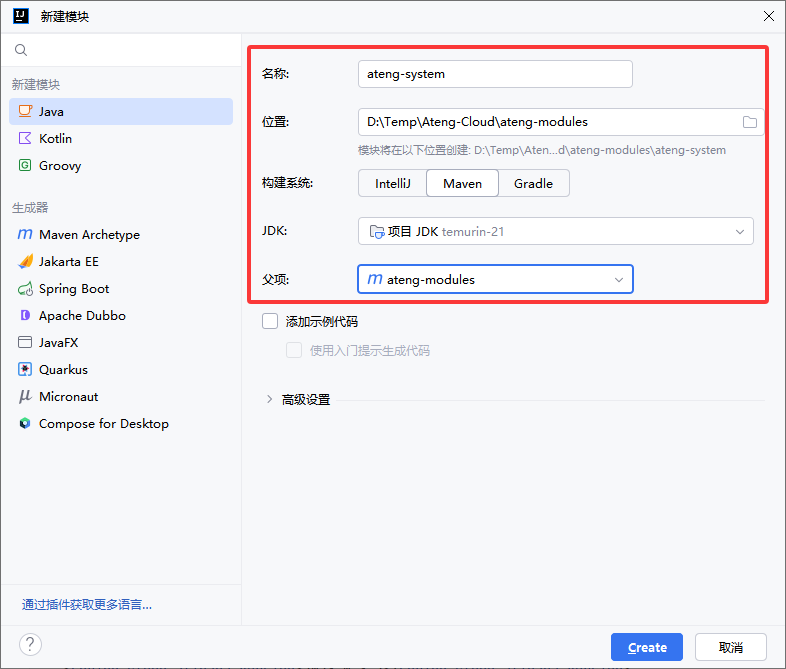
修改 pom.xml
<?xml version="1.0" encoding="UTF-8"?>
<project xmlns:xsi="http://www.w3.org/2001/XMLSchema-instance" xmlns="http://maven.apache.org/POM/4.0.0"
         xsi:schemaLocation="http://maven.apache.org/POM/4.0.0 https://maven.apache.org/xsd/maven-4.0.0.xsd">
    <!-- 项目模型版本 -->
    <modelVersion>4.0.0</modelVersion>

    <!-- 父模块 -->
    <parent>
        <groupId>io.github.kongyu666</groupId>
        <artifactId>ateng-modules</artifactId>
        <version>${revision}</version>
    </parent>

    <!-- 项目坐标 -->
    <artifactId>ateng-system</artifactId>
    <description>
        ateng-system 系统模块
    </description>

    <!-- 服务依赖 -->
    <dependencies>

        <!-- Spring Boot Web Starter: 包含用于构建Web应用程序的Spring Boot依赖项 -->
        <dependency>
            <groupId>org.springframework.boot</groupId>
            <artifactId>spring-boot-starter-web</artifactId>
        </dependency>

        <!-- Spring Boot Starter Test: 包含用于测试Spring Boot应用程序的依赖项 -->
        <dependency>
            <groupId>org.springframework.boot</groupId>
            <artifactId>spring-boot-starter-test</artifactId>
            <scope>test</scope>
        </dependency>

        <!-- ateng-common-nacos 公共模块-Nacos模块,服务发现、配置管理 -->
        <dependency>
            <groupId>io.github.kongyu666</groupId>
            <artifactId>ateng-common-nacos</artifactId>
            <version>${revision}</version>
        </dependency>

    </dependencies>

    <!-- 构建配置 -->
    <build>
        <plugins>
            <!-- Spring Boot Maven 插件 -->
            <plugin>
                <groupId>org.springframework.boot</groupId>
                <artifactId>spring-boot-maven-plugin</artifactId>
                <version>${spring-boot.version}</version>
                <executions>
                    <execution>
                        <id>repackage</id>
                        <goals>
                            <goal>repackage</goal>
                        </goals>
                    </execution>
                </executions>
            </plugin>
        </plugins>
    </build>

</project>添加模块
在业务父模块中添加业务子模块,然后点击再重新加载项目
<modules>
    <module>ateng-system</module>
</modules>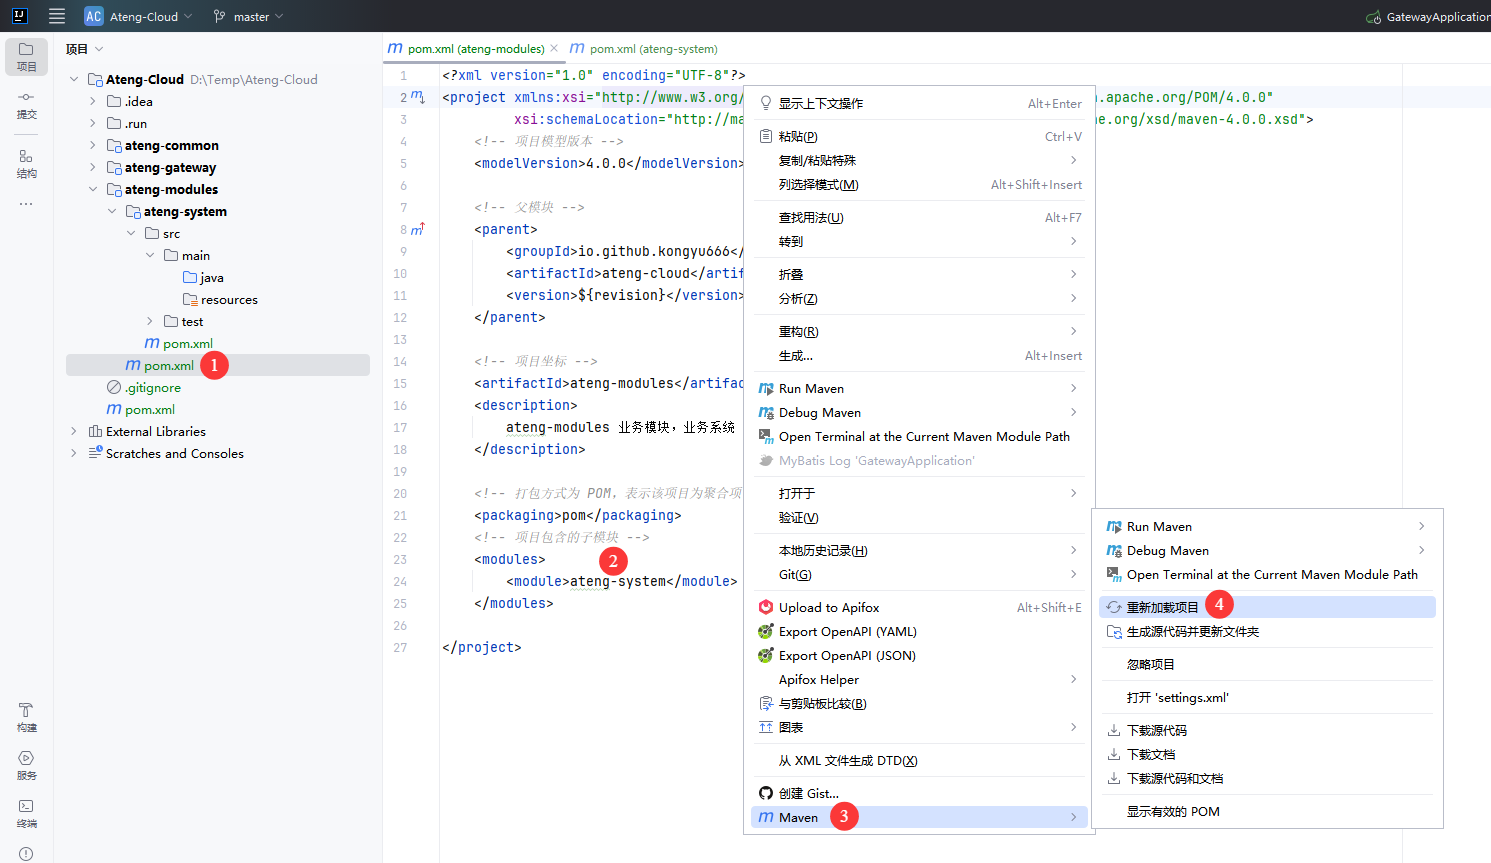
创建Application
新建 Java 类,创建 Application
输入包名和类名
io.github.kongyu666.system.SystemApplication修改application
package io.github.kongyu666.system;

import org.springframework.boot.SpringApplication;
import org.springframework.boot.autoconfigure.SpringBootApplication;
import org.springframework.cloud.client.discovery.EnableDiscoveryClient;

@SpringBootApplication
@EnableDiscoveryClient // 启动Nacos服务发现
public class SystemApplication {

    public static void main(String[] args) {
        SpringApplication.run(SystemApplication.class, args);
    }

}创建配置
新建 配置文件
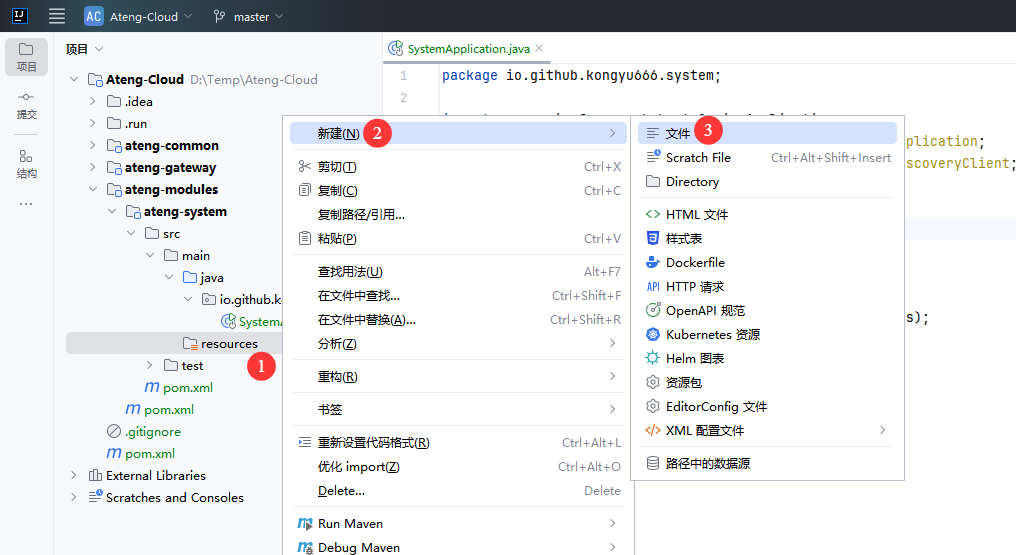
创建 application.yml
server:
  port: 16811
  servlet:
    context-path: /
spring:
  main:
    web-application-type: servlet
  application:
    name: ${project.artifactId}
---
# 环境配置
spring:
  profiles:
    active: @profiles.active@
desc: @profiles.desc@创建 application-dev.yml
# nacos 配置
spring:
  cloud:
    nacos:
      # nacos:8848 服务地址
      server-addr: 192.168.1.10:30648
      username: nacos
      password: Admin@123
      discovery:
        # 注册组
        group: ${spring.profiles.active}
        namespace: a8126e6d-5758-4f5b-b892-2522a250074c
      config:
        # 配置组
        group: ${spring.profiles.active}
        namespace: a8126e6d-5758-4f5b-b892-2522a250074c
  config:
    import: # 引入配置nacos中的配置application-common.yml
      - optional:nacos:application-common.yml
- optional:nacos:${spring.application.name}.yml创建 banner.txt
         █████╗ ████████╗███████╗███╗   ██╗ ██████╗
        ██╔══██╗╚══██╔══╝██╔════╝████╗  ██║██╔════╝
        ███████║   ██║   █████╗  ██╔██╗ ██║██║  ███╗
        ██╔══██║   ██║   ██╔══╝  ██║╚██╗██║██║   ██║
        ██║  ██║   ██║   ███████╗██║ ╚████║╚██████╔╝
        ╚═╝  ╚═╝   ╚═╝   ╚══════╝╚═╝  ╚═══╝ ╚═════╝

${AnsiColor.CYAN}        Application Name:${AnsiColor.BLACK} ${AnsiColor.BRIGHT_GREEN}${spring.application.name:Ateng} ${AnsiColor.BLACK}
${AnsiColor.CYAN}        SpringBoot Version:${AnsiColor.BLACK} ${AnsiColor.BRIGHT_GREEN}${spring-boot.version} ${AnsiColor.BLACK}
${AnsiColor.CYAN}        Profiles Active:${AnsiColor.BLACK} ${AnsiColor.BRIGHT_GREEN}${spring.profiles.active:-} ${AnsiColor.BLACK}
${AnsiColor.CYAN} Profiles Describe:${AnsiColor.BLACK} ${AnsiColor.BRIGHT_GREEN}${spring.profiles.desc:-} ${AnsiColor.BLACK}启动应用
启动应用程序

在Nacos中查看应用
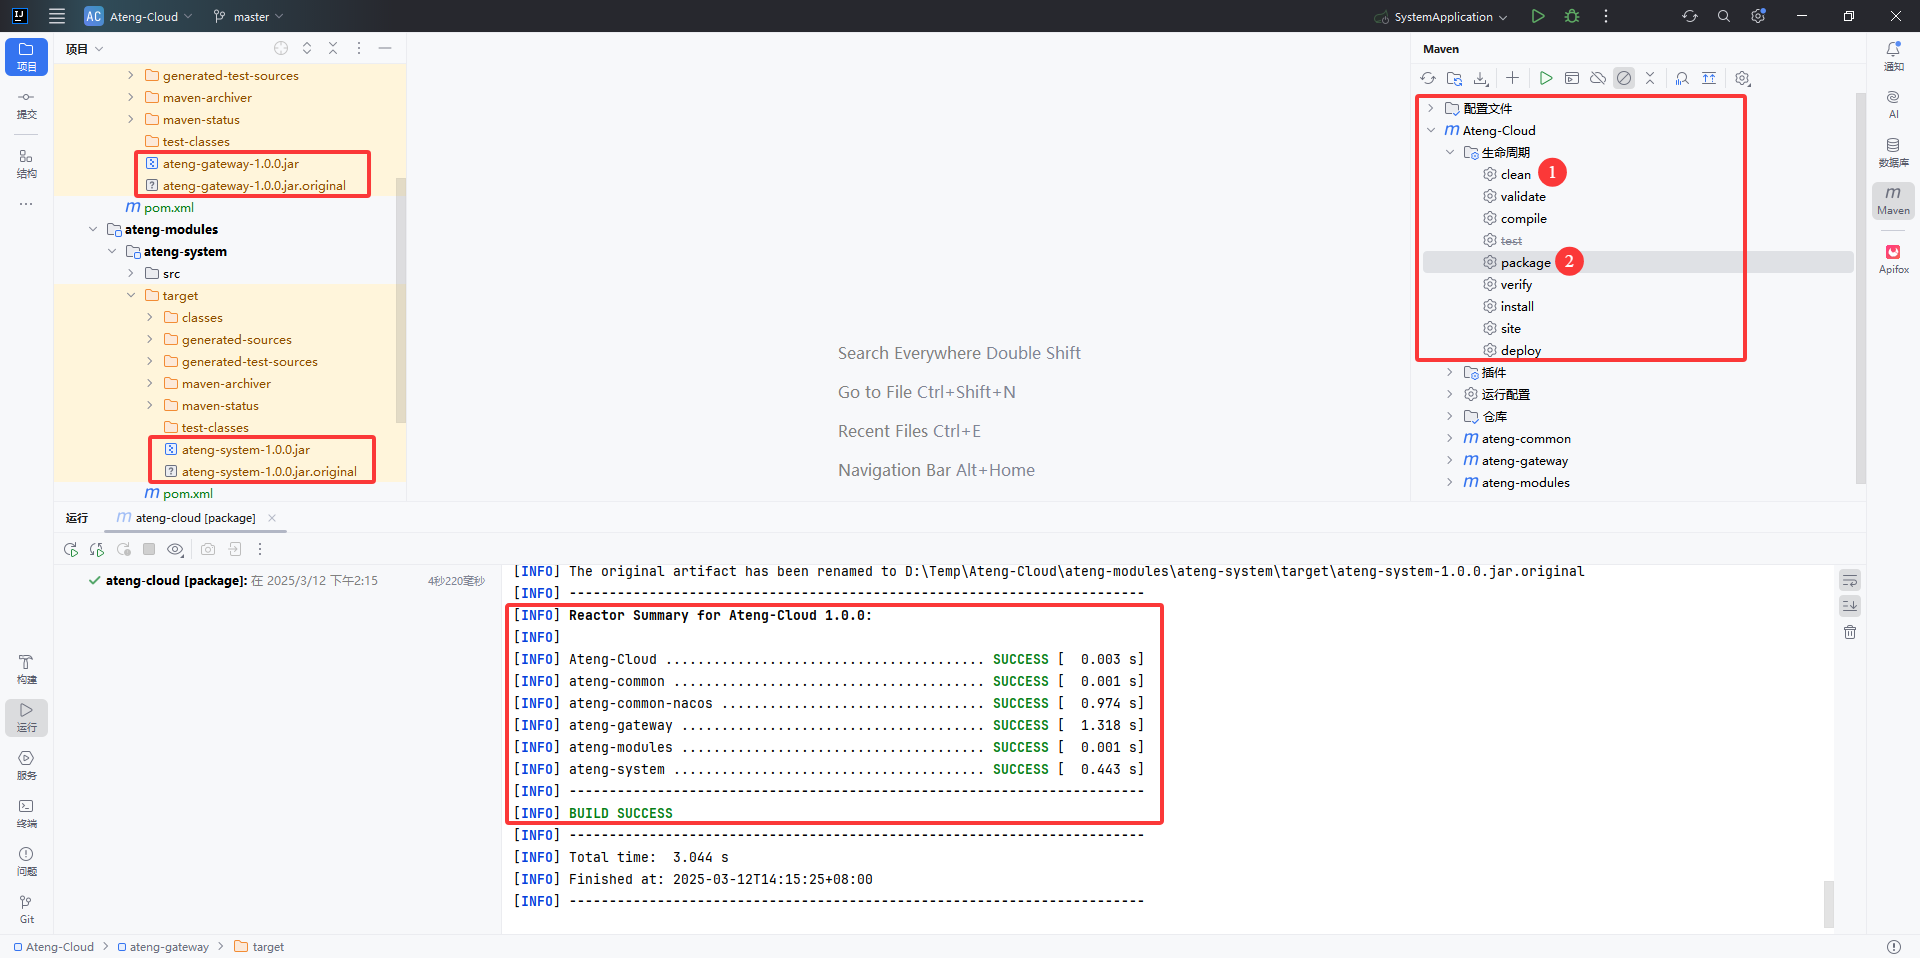
项目打包
全局打包
在 父模块 中可以直接对所有子模块全部进行打包操作
- 点击 Maven 的
生命周期的clean - 点击 Maven 的
生命周期的package
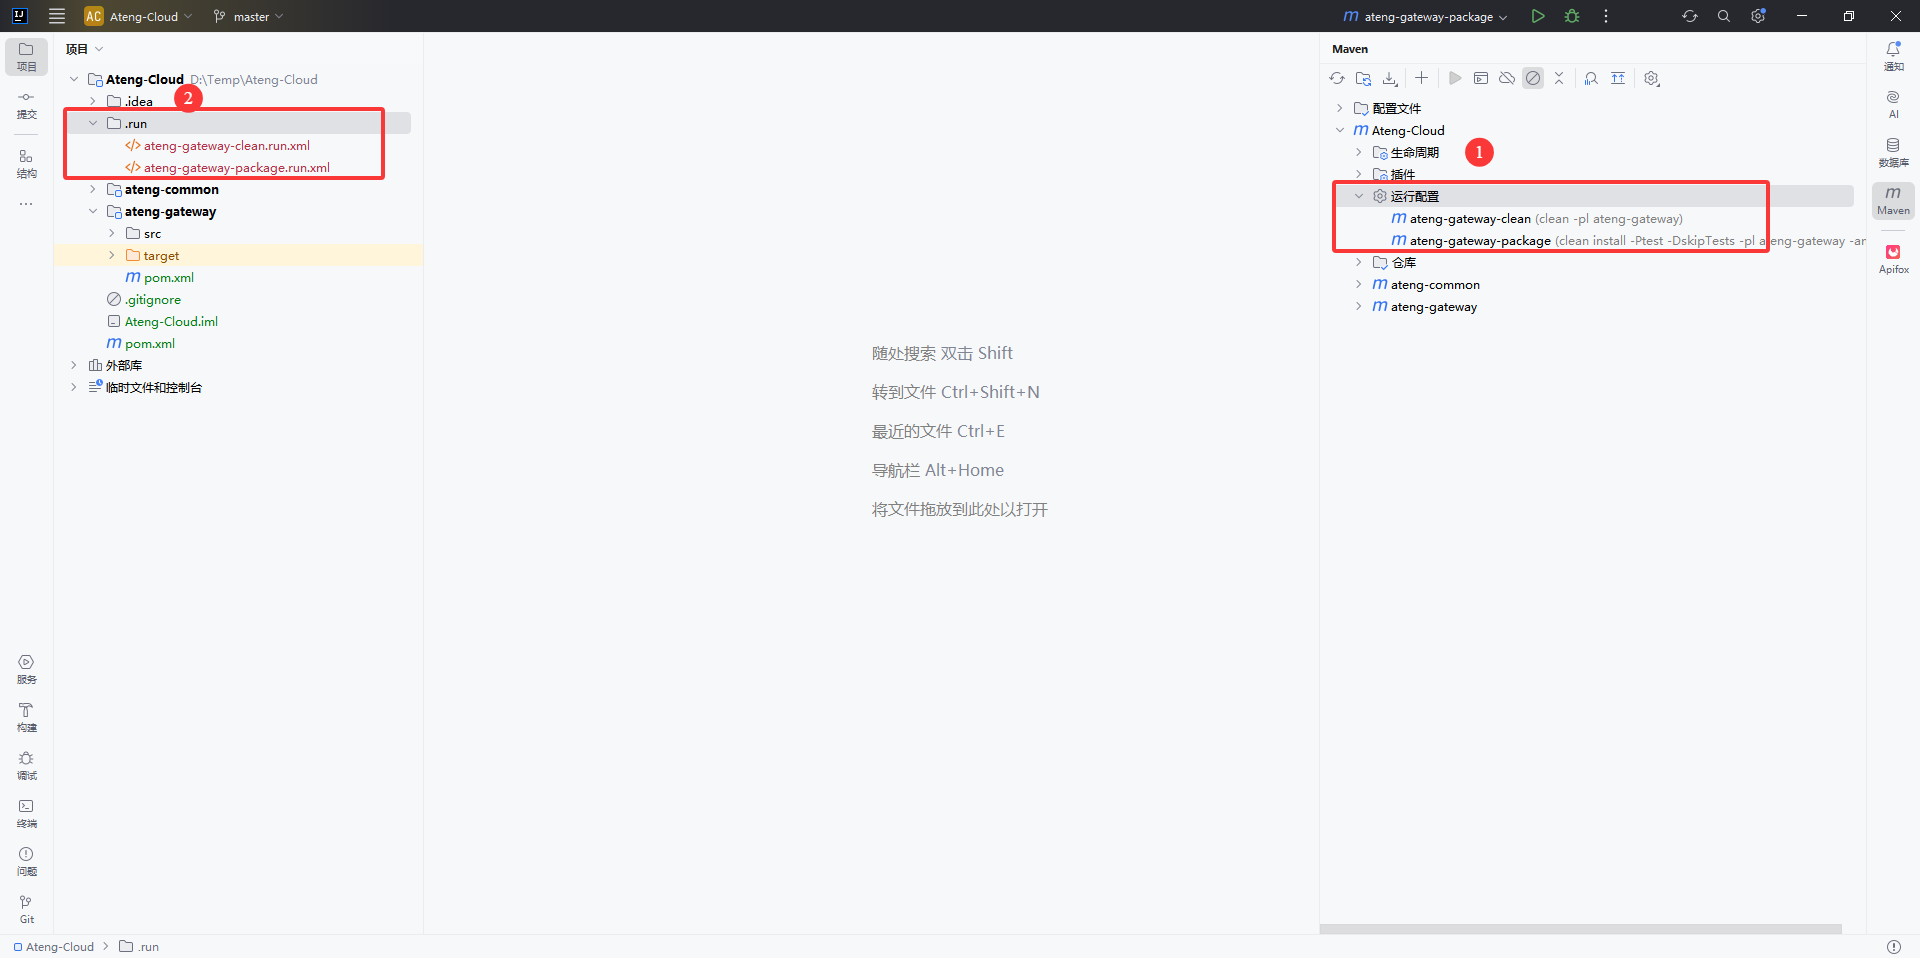
局部打包
在某些场景下,不需要全部模块都打包,而是指定一个子模块,例如这里只打包 网关模块
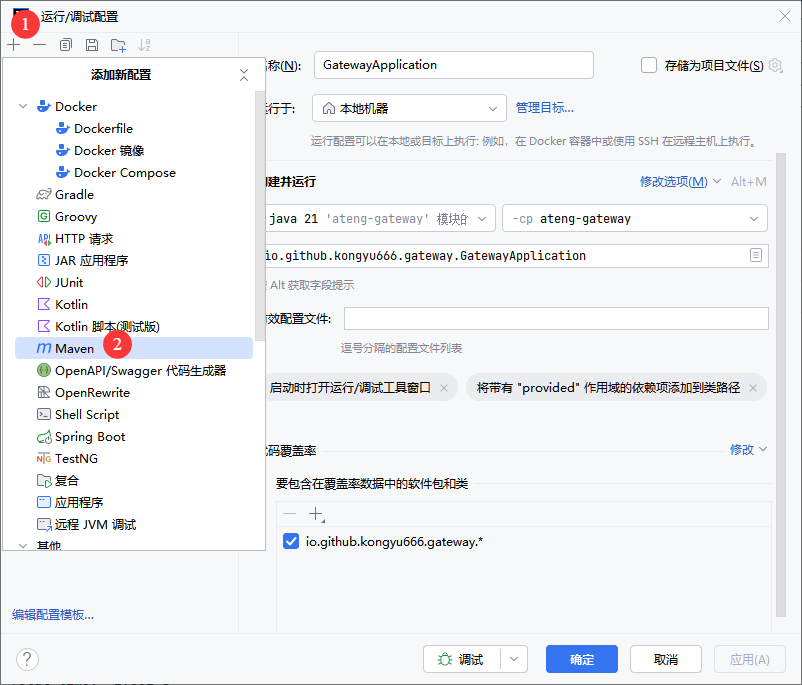
添加配置
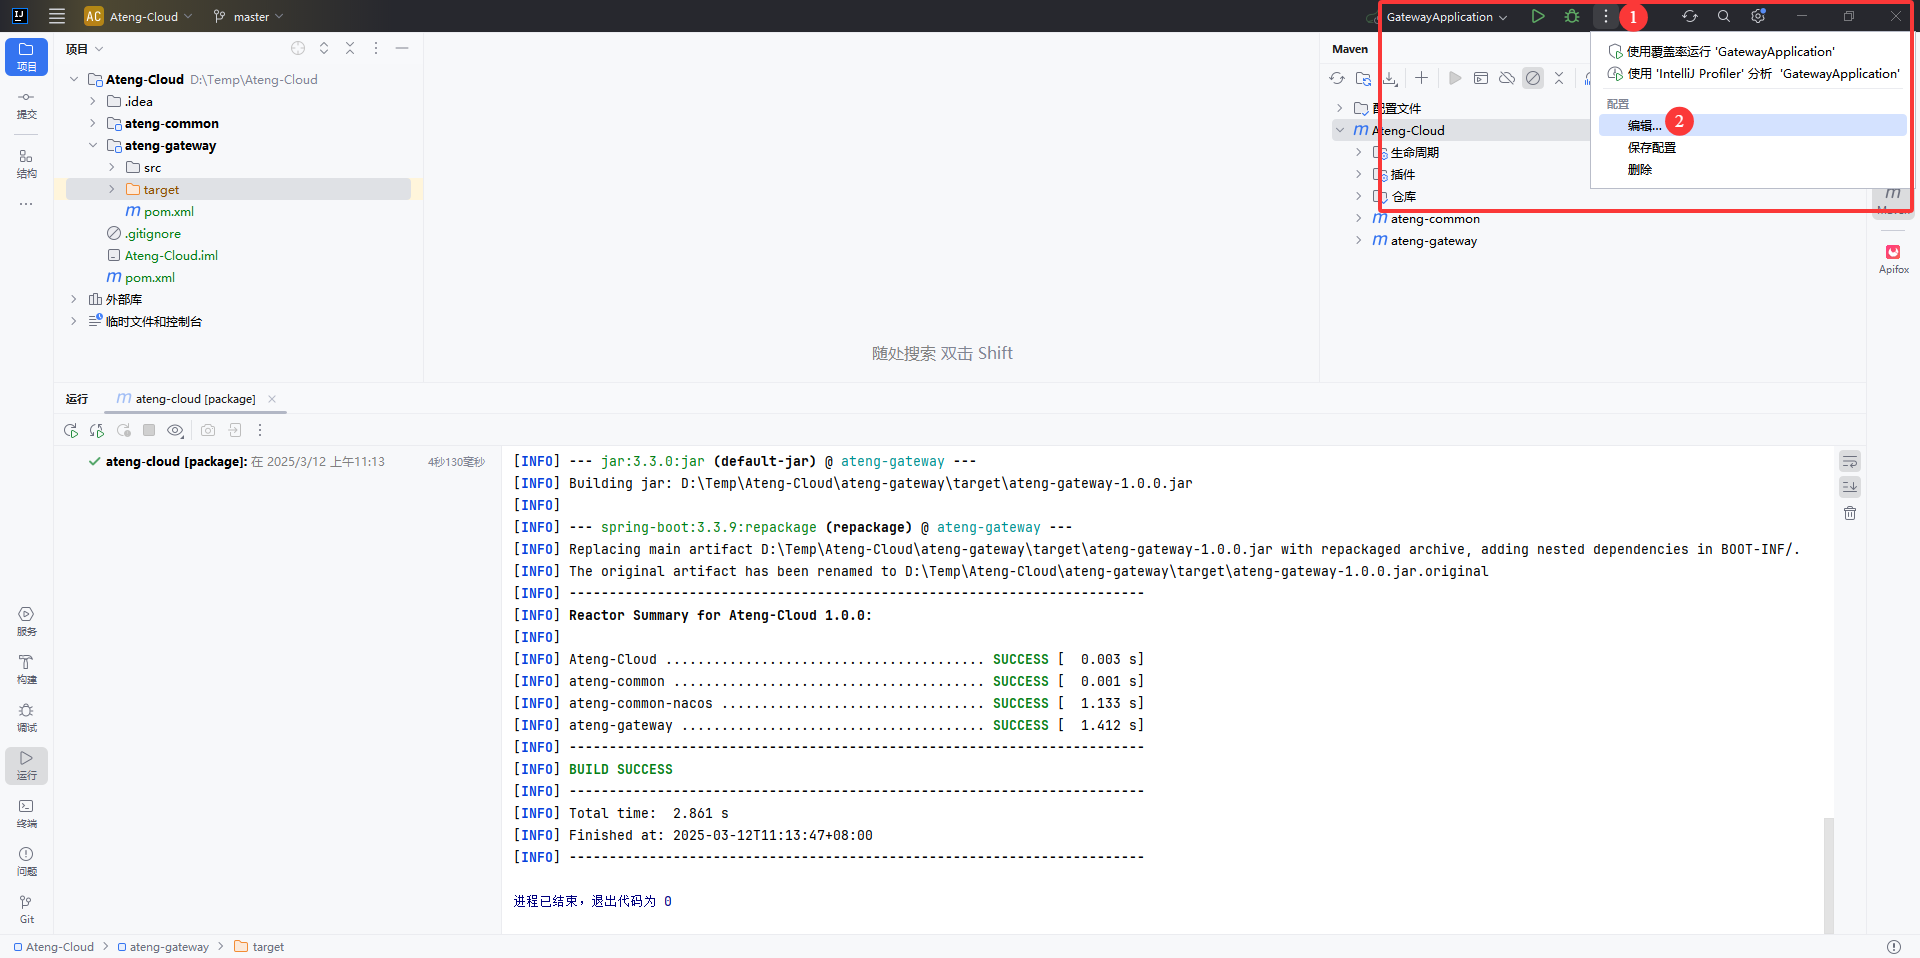
添加 Maven
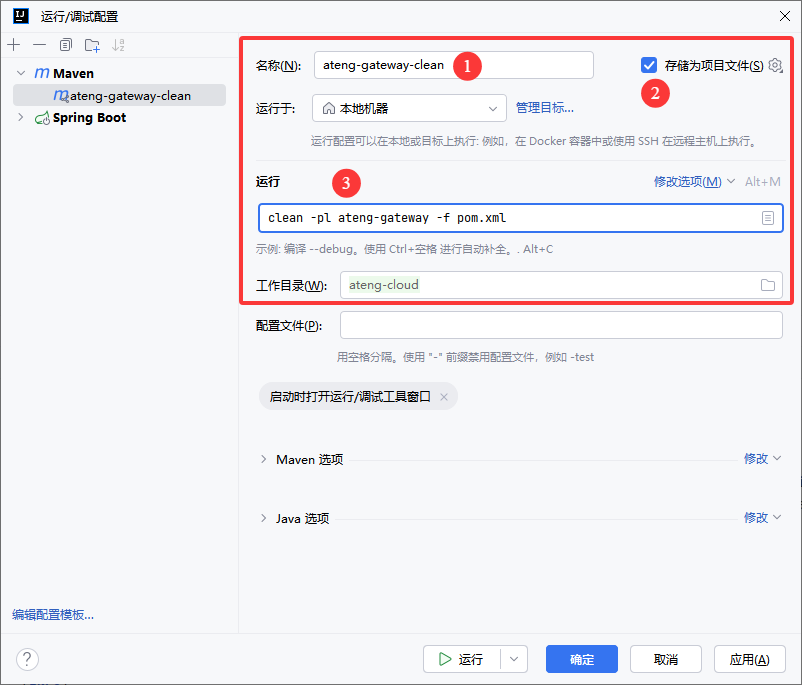
设置 clean
子模块使用以下运行命令
clean -pl ateng-gateway -f pom.xml子模块的子模块(例如ateng-system模块)下使用以下运行命令
clean -pl ateng-modules/ateng-system -f pom.xml-pl ModulesName: 指定的模块。
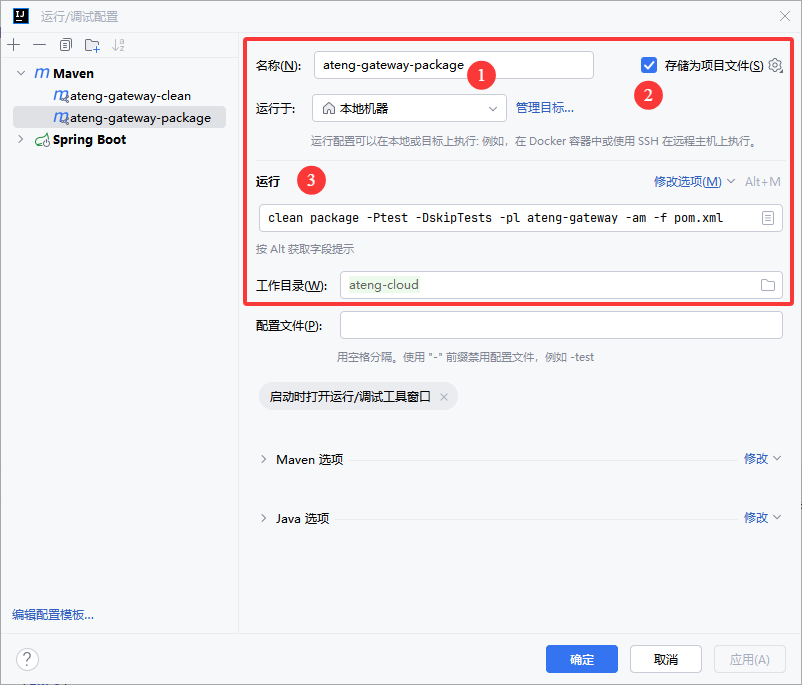
设置 package
子模块使用以下运行命令
clean package -Ptest -DskipTests -pl ateng-gateway -am -f pom.xml子模块的子模块(例如ateng-system模块)下使用以下运行命令
clean package -Ptest -DskipTests -pl ateng-modules/ateng-system -am -f pom.xml-Ptest: 激活testMaven profile。-pl ModulesName: 指定构建的模块。-am: 同时构建该模块的所有依赖模块。
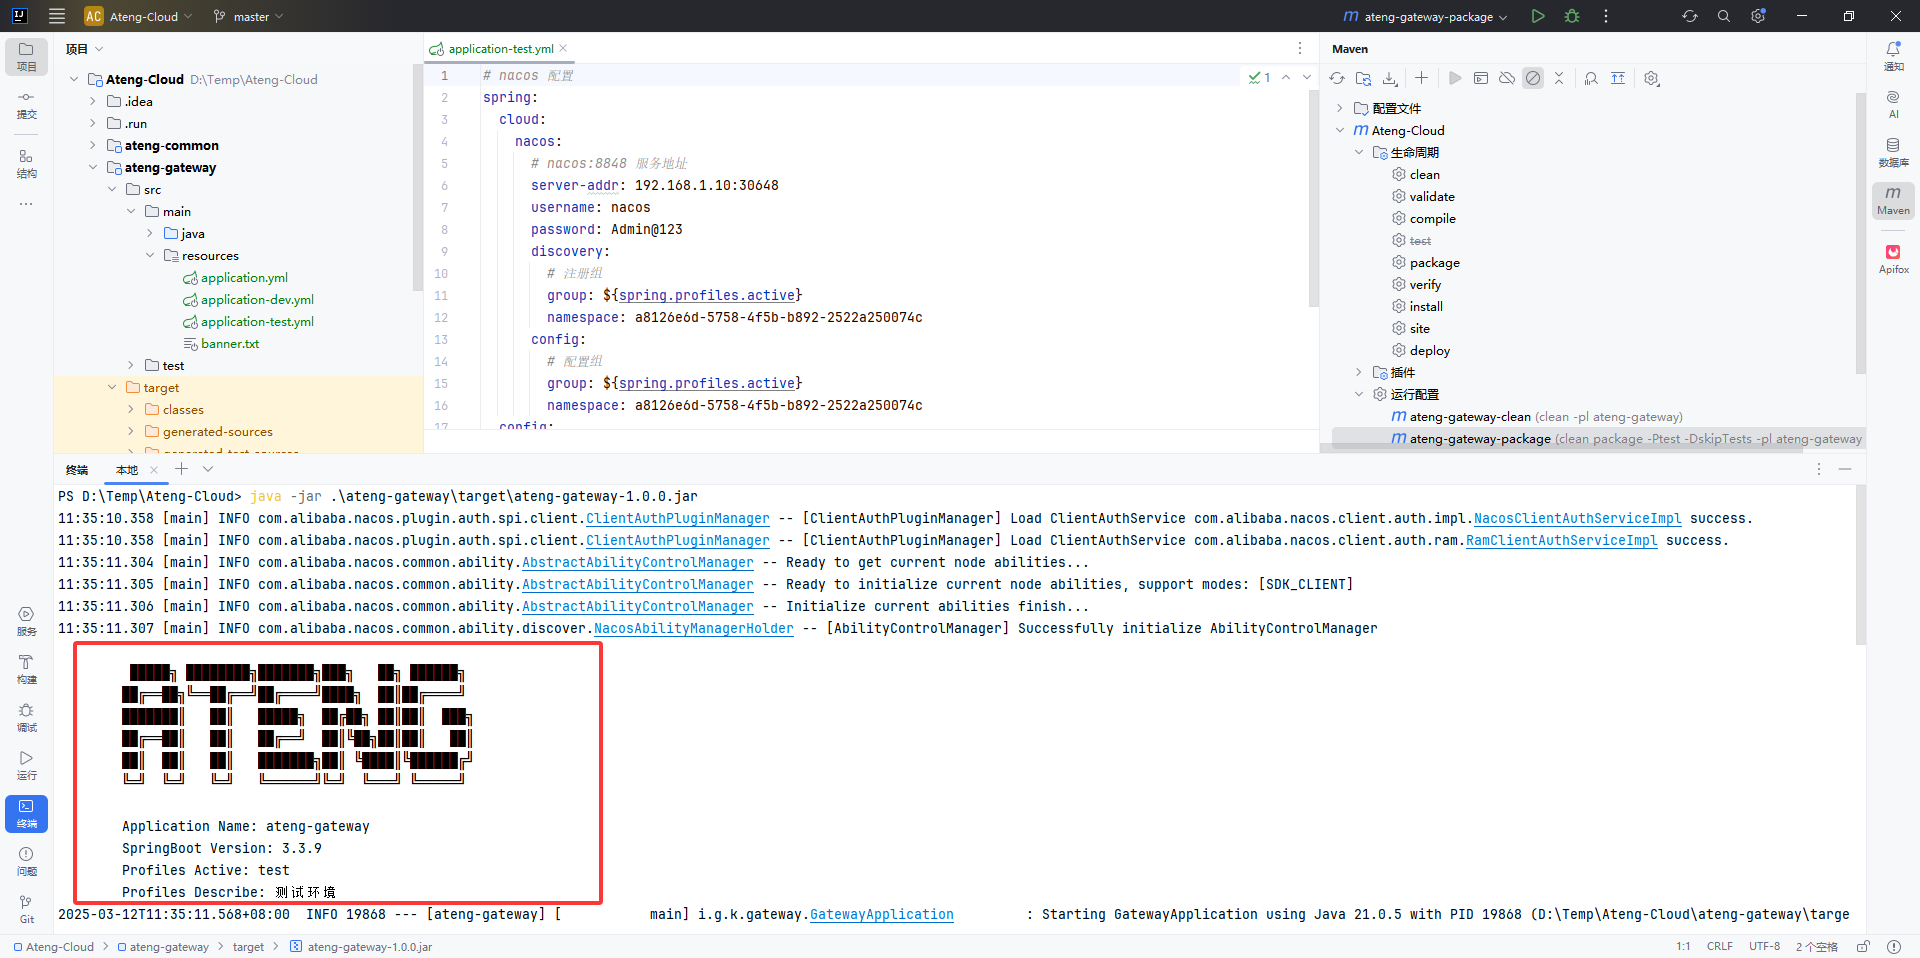
查看配置
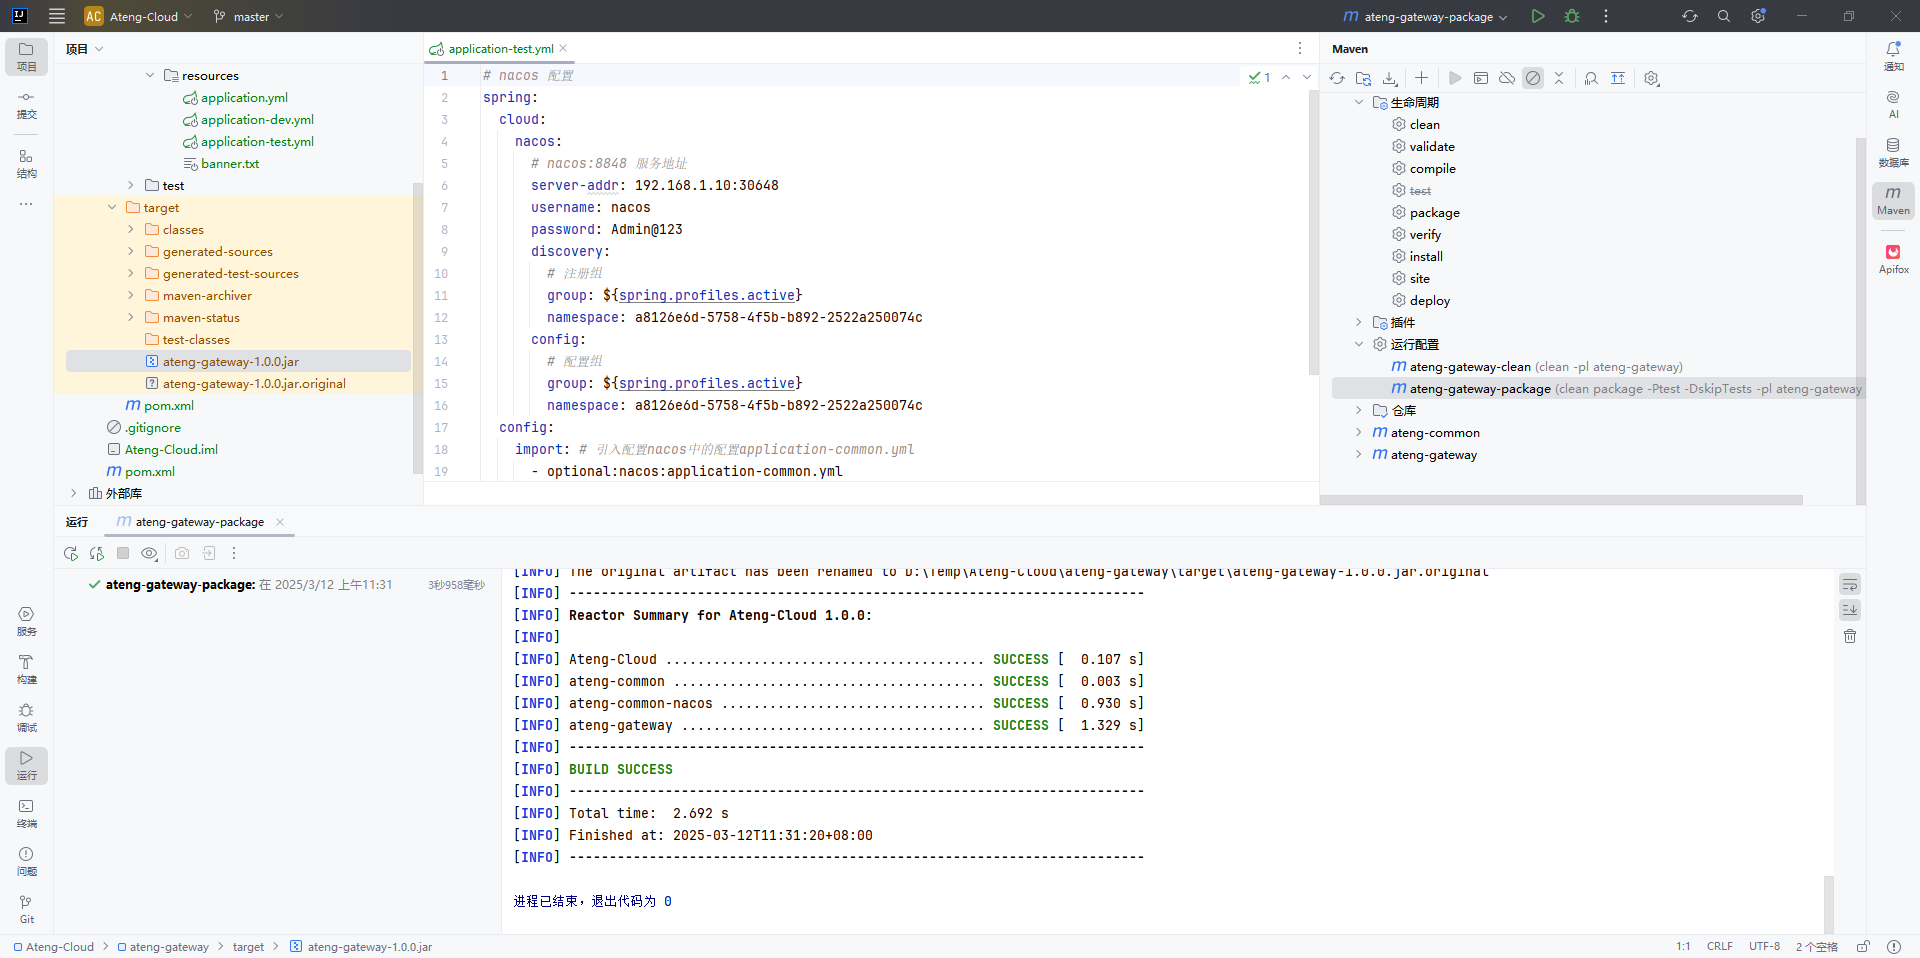
打包模块
按照一下流程进行打包
- 先使用
ateng-gateway-clean清空target目录(也可以直接进行打包操作,因为打包操作里面配置了clean。这个clean是用于切换运行环境的场景下需要使用) - 确保存在
application-test.yml配置文件,打包的时候是使用test环境配置,不然无法找到Nacos的配置会报错 - 再使用
ateng-gateway-package打包 - 运行 Jar 文件测试
运行测试
PS D:\Temp\Ateng-Cloud> java -jar .\ateng-gateway\target\ateng-gateway-1.0.0.jar